Ansible quickstart
In this quickstart guide, we will write our first script/playbook with Ansible.
This tutorial covers how to create a simple Ansible script through Windmill web IDE. See the dedicated page to develop scripts locally.
Scripts are the basic building blocks in Windmill. They can be run and scheduled as standalone, chained together to create Flows or displayed with a personalized user interface as Apps.
Scripts consist of 2 parts:
- Code: for Ansible this is a playbook file written in yaml.
- Settings: settings & metadata about the Script such as its path, summary, description, JSON Schema of its inputs (inferred from its signature).
When stored in a code repository, these 2 parts are stored separately at <path>.playbook.yml and <path>.script.yaml
Settings

As part of the settings menu, each script has metadata associated with it, enabling it to be defined and configured in depth.
- Summary (optional) is a short, human-readable summary of the Script. It will be displayed as a title across Windmill. If omitted, the UI will use the
pathby default. - Path is the Script's unique identifier that consists of the script's owner, and the script's name. The owner can be either a user, or a group (folder).
- Description is where you can give instructions through the auto-generated UI to users on how to run your Script. It supports markdown.
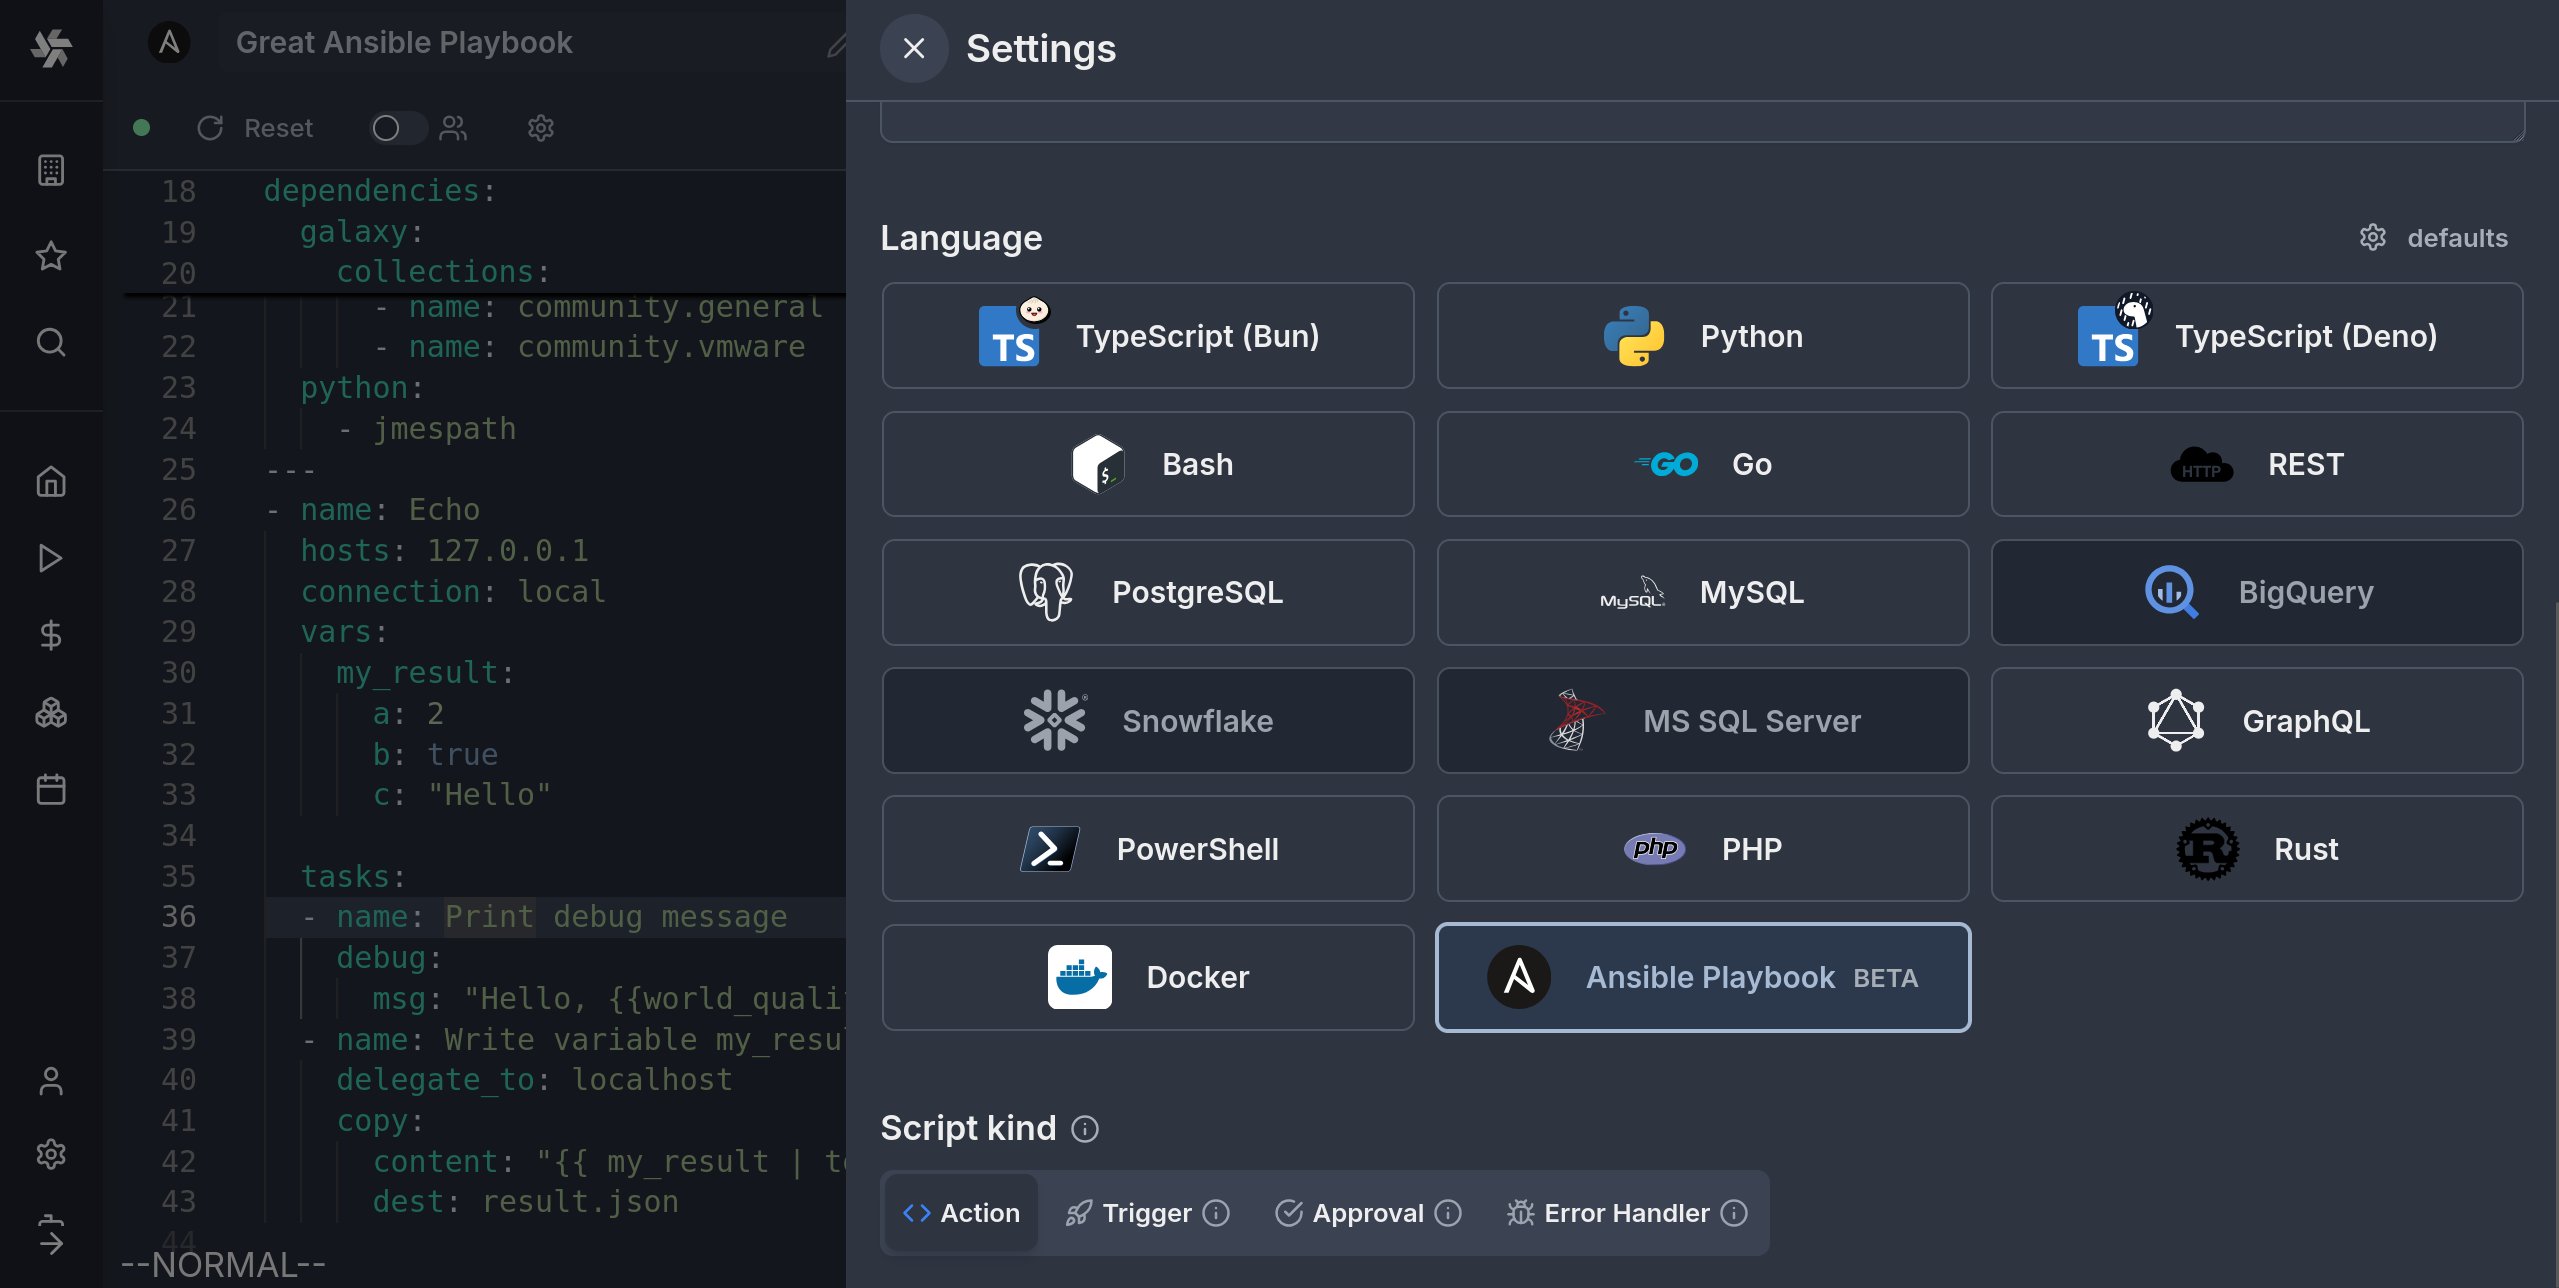
- Language of the script.
- Script kind: Action (by default), Trigger, Approval, Error handler or Preprocessor. This acts as a tag to filter appropriate scripts from the flow editor.
This menu also has additional settings on Runtime, Generated UI and Triggers.
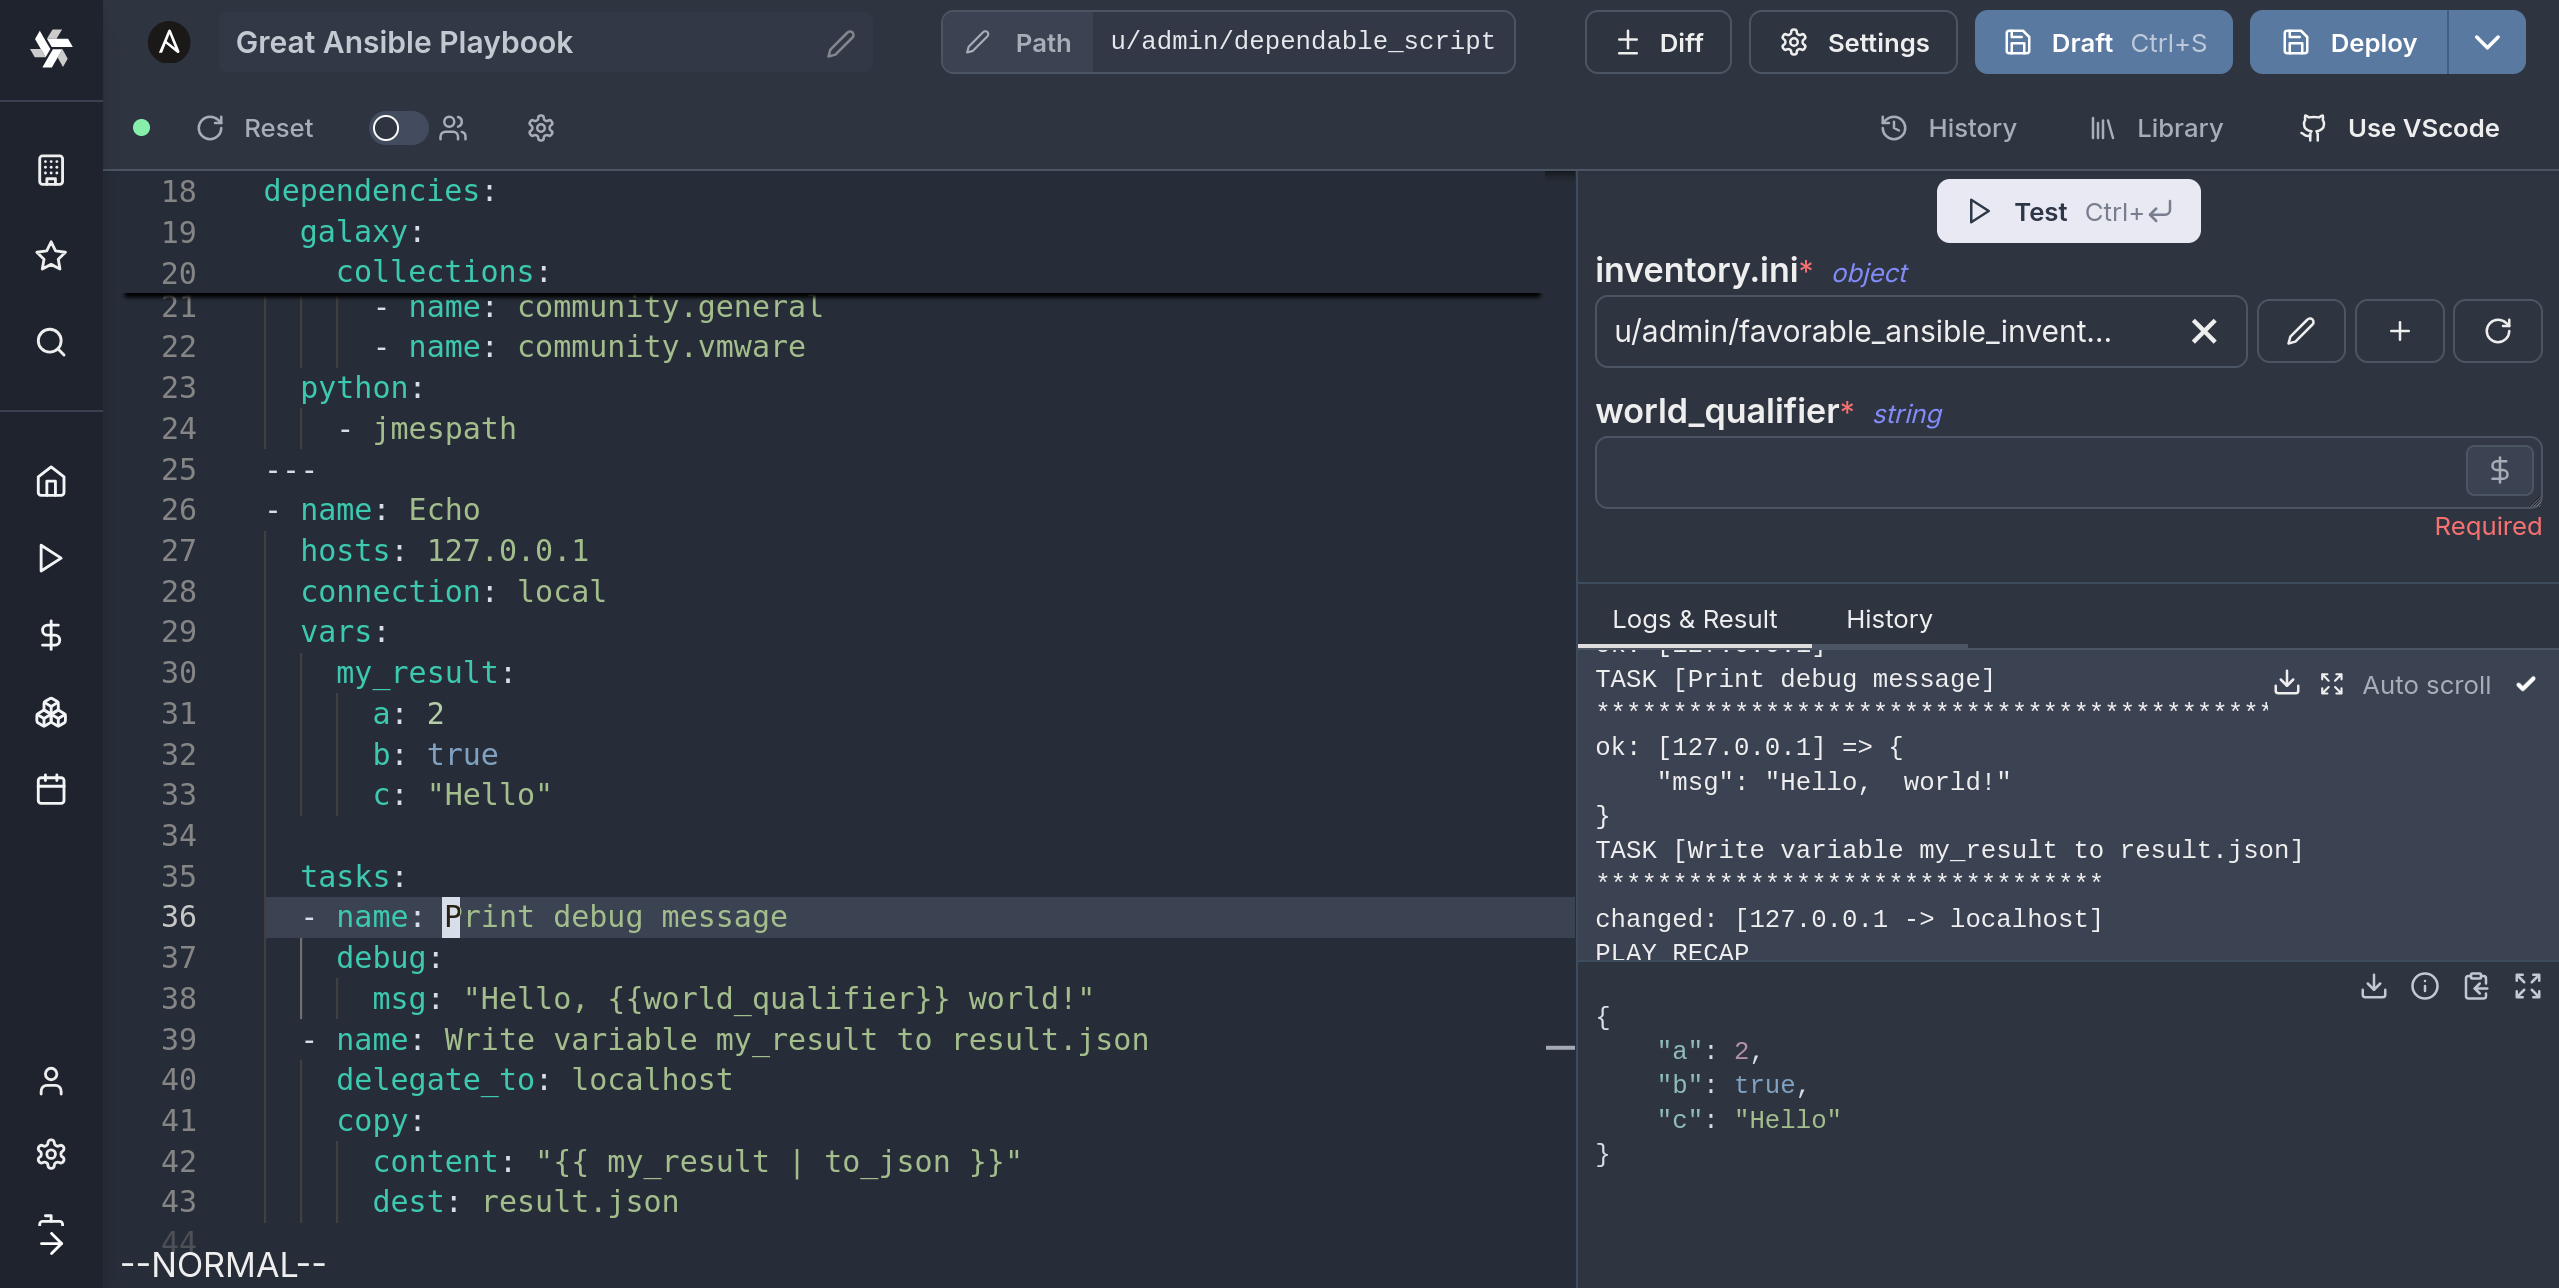
Now click on the code editor on the left side.
Code (Playbook)
In order to make Ansible playbooks compatible with the Windmill environment and script model, there is some extra information preceding the start of the playbook that can be entered. Because of this, an Ansible playbook in Windmill will typically look like this:
---
inventory:
  - resource_type: ansible_inventory
    # You can pin an inventory to this script:
    # resource: u/user/your_resource

# Additional inventories available as script arguments
additional_inventories:
  - "delegate_git_repository/hosts/inventory.ini"

# File resources will be written in the relative \`target\` location before
# running the playbook
files:
  - resource: u/user/fabulous_jinja_template
    target:  ./config_template.j2

# Define the arguments of the Windmill script
extra_vars:
  world_qualifier:
    type: string

dependencies:
  galaxy:
    collections:
      - name: community.general
      - name: community.vmware
  python:
    - jmespath
---
- name: Echo
  hosts: 127.0.0.1
  connection: local
  vars:
    my_result:
      a: 2
      b: true
      c: "Hello"

  tasks:
  - name: Print debug message
    debug:
      msg: "Hello, {{world_qualifier}} world!"
  - name: Write variable my_result to result.json
    delegate_to: localhost
    copy:
      content: "{{ my_result | to_json }}"
      dest: result.json
There are two YAML documents in series, the second being the Ansible playbook. The first one is only used by Windmill, and will not be visible to Ansible when executing the playbook. It contains different sections that declare some metadata about the script.
We will now go thorugh each of these sections.
Arguments (extra-args)
Windmill scripts can take arguments, and in order to define the names and types of the arguments you can use this section. These definitions will be parsed allowing the frontend to interactively display dynamic inputs for the script.
extra_vars:
  world_qualifier:
    type: string
  nested_object:
    type: object
    properties:
      a:
        type: string
      b:
        type: number
  some_arr:
    type: array
    objects:
      type: string
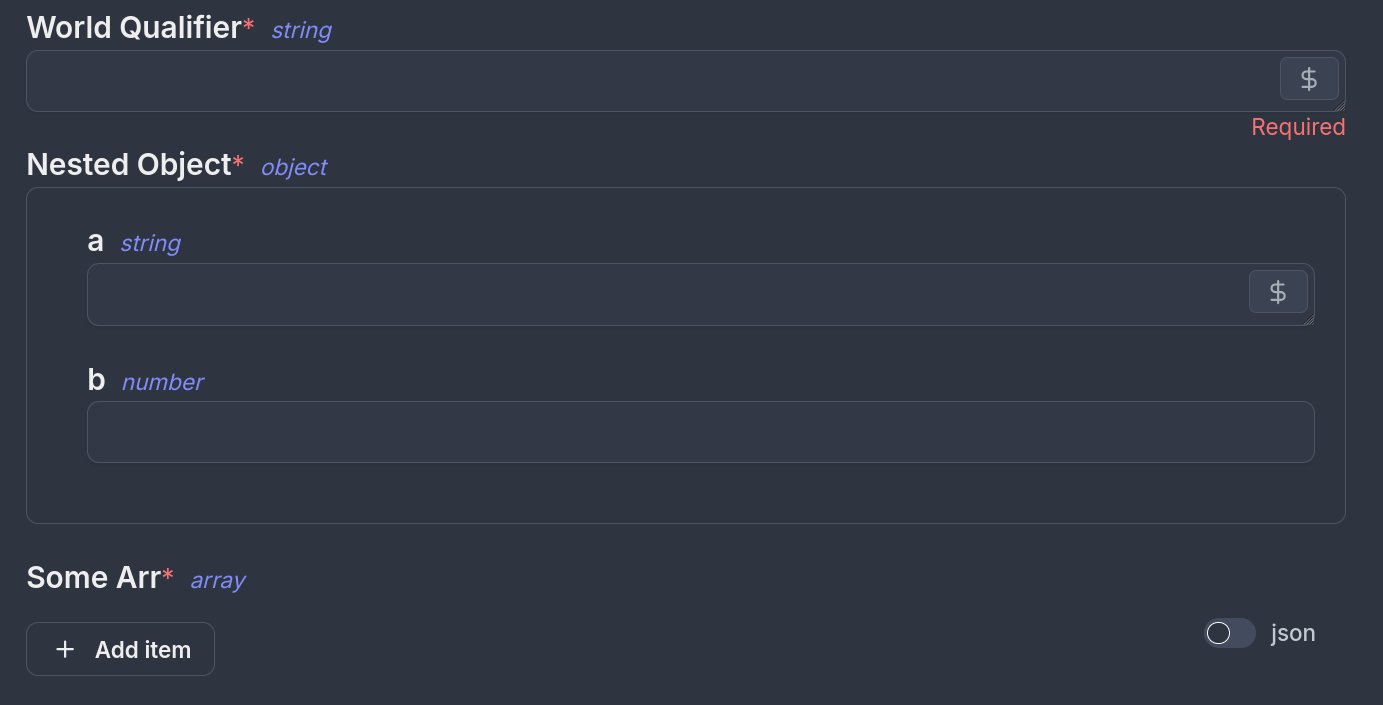
The type definition is inspired and tries to follow the OpenAPI Data Types standard. Note that not all features / types are supported, the best way to know what is supported is to test it out in the Web IDE.
You can set a default value for your arguments by using a default: field, for example:
extra_vars:
  my_string:
    type: string
    default: 'Fascinating String of Words'
To use Windmill resources as types you can use the following type definition:
extra_vars:
  my_resource:
    type: windmill_resource
    resource_type: postgresql

Under the hood, Windmill will pass these variables using the --extra-vars flag to Ansible, so you can expect the according behavior.
Static resources and variables
Resources and variables that are hardcoded to a particular script can also be defined in the extra-vars section. This is because they are similarly passed through the --extra-vars flag in the Ansible playbook.
This is what the syntax looks like:
extra_vars:
  my_variable:
    type: windmill_variable
    variable: u/user/my_variable
  my_resource:
    type: windmill_resource
    resource: u/user/my_resource
Under resource or variable you can statically link the path to the resource/variable. As you do, you will notice the UI update and hide the resource input as it is now static.
Note that Variables defined this way can only be static. If you want to use non-static Variables, define a normal argument with type: string and from the UI fill it with one of your Variables or Secrets.
Return values
In Windmill scripts usually have a return value, which allows scripts to be chained in flows and run conditionally on the result of a previous operation. For Ansible playbooks you can achieve the same result by having one of the tasks (preferably the last one for coherence of results/errors) write a file named result.json with the JSON object you want to return:
---
tasks:

  [...]

  - name: Write variable my_result to result.json
    delegate_to: localhost
    copy:
      content: "{{ my_result | to_json }}"
      dest: result.json
Note that valid json must be written to the file or else the job will fail. Also, this should be done by the control node i.e. your worker, so it's important to use the delegate_to: localhost directive.
Inventories
When using ansbile playbooks, you would usually run a command such as ansible-playbook playbook.yml -i inventory.ini. The ways to pass inventories to Ansible in Windmill is by filling the following section:
inventory:
  - resource_type: ansible_inventory
To create similar resource type, refer to creating plain text resources. Otherwise ansible_inventory should be available after syncing resource types from the hub.
After adding this in the Web IDE, you will see a new inventory.ini argument pop up. You can then select or create a new ansible_inventory resource.

If you don't want one of the inputs of the script be the inventory, you can pin a specific resource to the script by specifying its path. In this case you don't need to specify the resource_type anymore:
inventory:
  - resource: u/user/my_ansible_inventory
Then the UI will not prompt you for the inventory but will use this resource at every run of the script. If otherwise you wish to not specify any inventory, you can remove the section altogether
By default, the inventory will be named inventory.ini, but if your inventory needs to have a different extension (e.g. dynamic invetories) you can specify the name of the inventory file like this:
inventory:
  - resource_type: c_dynamic_ansible_inventory
    name: hcloud.yml
Additionally, if you need to pass multiple inventories, you just need to continue the yaml array with your other invetories, they will all be passed to the ansible-playbook command.
# Declaring three different inventories to be passed to the playbook
inventory:
  - resource: u/user/my_base_inventory
    name: base.ini
  - resource_type: ansible_inventory
  - resource_type: c_dynamic_ansible_inventory
    name: hcloud.yml
Additional inventories
You can also declare additional inventories that will be made available as script arguments without specifying their source. This allows users to dynamically select inventories when running the script.
additional_inventories:
  - name: "Extra inventories"
    options:
      - "delegate_git_repository/hosts/inventory1.ini"
      - "delegate_git_repository/hosts/inventory2.ini"
      - "delegate_git_repository/hosts/inventory3.ini"
They can also be defined statically to always be passed in for this script:
additional_inventories:
  - "delegate_git_repository/hosts/permanent_inventory.ini"
Note that this only declares the inventory, but you still need to make it available by either having it in a git repo or using file resources. Otherwise ansible will fail saying it couldn't find your inventory.
Other non-inventory file resources
It sometimes happens that your Ansible playbook depends on some text file existing at a relative path to the playbook. This can be a configuration file, a template, some other file that you can't inline or otherwise is simpler to keep as a separate file. In this case, Windmill's plain text file resources can be used to create these files at the specified path before running the playbook. The syntax will be the following:
files:
  - resource: u/user/fabulous_jinja_template
    target:  ./config_template.j2
In the example above, the resource u/user/faboulous_jinja_template is a special plain text file resource. The target ./config_template.j2 is the path relative to the playbook where the file will be created and where the playbook can access it.
Now you can write your playbook assuming that this file will exist at the time of execution.
Variable inside files
If you want to achieve a similar effect with a variable or a secret, you can use a similar syntax:
files:
  - variable: u/user/my_ssh_key
    target:  ./id_rsa
And the content of the variable will be written to the file.
This is useful when you want to store the data in a secret for example, like you would do for SSH keys.
Ansible and SSH
To succesfully have the playbook SSH, you might need to follow these tips:
- Write the SSH key into a secret variable, and make sure it has an ending newline, otherwise you might get an error.
-----BEGIN OPENSSH PRIVATE KEY-----
MHgCAQEEIQDWlK/Rk2h4WGKCxRs2SwplFVTSyqouwTQKIXrJ/L2clqAKBggqhkjO
PQMBB6FEA0IABErMvG2Fa1jjG7DjEQuwRGCEDnVQc1G0ibU/HI1BjkIyf4d+sh
91GhwKDvHGbPaEQFWeTBQ+KbYwjtomLfmZM[...]
-----END OPENSSH PRIVATE KEY-----
- Make a file for the script that will contain this SSH key. Make sure to add the
mode: '0600'or you might get another error.
files:
  - variable: u/user/my_ssh_key
    target:  ./ssh_key
    mode: '0600'
- In your inventory file, you'll want to add these :
...
[your_host:vars]
ansible_host=your_host
ansible_user=john # The SSH user
ansible_ssh_private_key_file=ssh_key # The file we declared where the SSH key can be found.
ansible_ssh_common_args='-o StrictHostKeyChecking=no' # This skips host key verification, avoiding the error. Alternatively, you can add the host to known_hosts, either as an init script or a task in your playbook
...
Dependencies
Ansible playbooks often depend on Python packages or Ansible Galaxy Collections. In Windmill you can specify these dependencies in the dependencies section and Windmill will take care of satisfying them before running the playbook.
dependencies:
  galaxy:
    collections:
      - name: community.general
      - name: community.vmware
    roles:
      - name: geerlingguy.apache
  python:
    - jmespath
The syntax is similar to ansible-builder and Execution Environments, however all is installed locally using the same technology as for managing Python dependencies in Python scripts, meaning no extra container is created.
Currently the Windmill image supporting Ansible runs the full ansible and not ansible-core. You can expect the respective collections to be preinstalled.
Git repo dependencies
Outside of galaxy dependencies, a role or collection can exist on a git repo and be imported as such. The only caveat is that the repo needs to be a valid role or collection at its root. Check the ansible documentation for more information.
collections:
  - name: git+https://github.com/organization/collection.git
    type: git
    version: main
To enable more flexibility however, it is possible to declare a git repo to be cloned at a specified location before the playbook is run. You can do this as follows:
git_repos:
  - url: [email protected]:some_user/your_git_repo.git
    target: ./git_repo1
    commit: a34ac4fa
    branch: prod
# An https or ssh url can be used:
  - url: https://github.com/some_user/your_other_git_repo.git
    target: ./git_repo2
If you do not specify the commit to be used, the latest commit hash will be stored in the script lockfile on deployment, and all subsequent executions will use that commit. This is done to ensure reproducibility. If you need to update this, you can simply redeploy the script
If you want to clone a private repo, you can add the ssh private key like so:
git_ssh_identity:
  - u/user/ssh_id_priv
git_repos:
  - url: [email protected]:some_user/your_private_repo.git
    target: ./my_roles_and_collections
Ansible Vault
If you have files that are encripted by ansible vault, you need to pass a password to decrypt them. This can be easily done by storing the password as a Windmill secret, and specifying the path to the secret in the metadata section of your playbook:
vault_password: u/user/ansible_vault_password
If you are using multiple vault password with Vault IDs, the setup is slightly different. You need to define your password files, and also add them as file resources:
vault_id:
  - label1@password_filename1
  - label2@password_filename2
  - label3@password_filename3
files:
  - variable: u/user/password_for_label1
    target: ./password_filename1
  - variable: u/user/password_for_label2
    target: ./password_filename2
  - variable: u/user/password_for_label3
    target: ./password_filename3
Playbook options
Pass ansible-playbook flags through the options block in the script metadata:
options:
  - vvv
  - forks: 10
  - timeout: 30
  - flush_cache
  - force_handlers
  - limit: webservers:!db1.example.com
Supported entries:
| Entry | ansible-playbook flag |
|---|---|
vv / vvv / vvvv (1 to 6 vs) | -v (verbosity) |
verbosity: vvv | same as above |
forks: <int> | --forks |
timeout: <int> | --timeout |
flush_cache | --flush-cache |
force_handlers | --force-handlers |
limit: <pattern> | --limit (target a subset of hosts) |
The limit value may reference a script argument with {{ argname }} so a flow can pick the target host at runtime:
options:
  - limit: "{{ target_host }}"
extra_vars:
  target_host:
    type: string
Delegate the environment setup to a git repo (EE)
Parts of this feature depend on instance-wide blob storage, which is only available in Enterprise Edition.
You can choose to set a git repository that contains all your inventories, custom roles, and playbooks as an alternate way to run your ansible script. When declaring this you will get an additional UI that lets you explore the repository, and some helpers to help you define the inventories. You can do this by either declaring this section on the metadata part of the script:
delegate_to_git_repo:
  resource: u/user/git_repo_resource
Or using the utility button that will help you pick a git repo resource to be used.
You will need to first create a git_repository resource that points to the repository you're trying to use.
You will then see your editor split in two and a Hovering popup indicating the alternate execution mode is detected. The first time you do this the repo viewer will show a button to load the git repository. This will clone and cache the contents of your repository in blob storage, for you to explore the files from within windmill.
If you click on the top-right floating pop-up, you will access a screen letting you manage the definition of the git repo, and will contain some utils for ease of use. You can for example use the inventories section to define a subfolder containing your inventories and quickly import the filenames into the script.
If you want to set a path to the playbook you want executed, you can do so like so:
delegate_to_git_repo:
  resource: u/user/git_repo_resource
  playbook: playbooks/your_playbook.yml
If this is undefined, the worker will default to using the second YAML section like normal.
Inventory from the cloned repo
Point ansible at an inventory file (or directory) that lives inside the cloned repository:
delegate_to_git_repo:
  resource: u/user/git_repo_resource
  playbook: playbooks/site.yml
  inventories_location: inventories/dev.ini
The path is relative to the repository root. It is added to the ansible-playbook invocation as -i, alongside any inventories declared in the script metadata.
Installing requirements.yml from the cloned repo
If your repository ships its own requirements.yml, set install_requirements: true to have Windmill install the listed roles and collections after cloning, before the playbook runs:
delegate_to_git_repo:
  resource: u/user/git_repo_resource
  playbook: playbooks/site.yml
  install_requirements: true
The worker looks for requirements.yml, requirements.yaml, collections/requirements.yml, and roles/requirements.yml at the root of the cloned repo and runs ansible-galaxy role install -r and ansible-galaxy collection install -r on every match. If none are found, the step is skipped.
This is independent of the dependencies.galaxy block in the script metadata: use whichever fits your workflow, or both.
Dynamic field values
The playbook, commit, and inventories_location fields accept {{ argname }} placeholders that are substituted from the script's arguments before the repo is cloned and the playbook runs. This lets a flow pick the playbook, branch, or inventory at runtime:
delegate_to_git_repo:
  resource: u/user/git_repo_resource
  playbook: "playbooks/{{ playbook_name }}.yml"
  inventories_location: "inventories/{{ env }}.ini"
  commit: "{{ git_sha }}"
extra_vars:
  playbook_name:
    type: string
  env:
    type: string
  git_sha:
    type: string
Only string, number, and boolean argument values can be substituted. The path fields reject absolute paths and .. segments to prevent escaping the cloned repo.
Instant preview & testing
Look at the UI preview on the right: it was updated to match the input
signature. Run a test (Ctrl + Enter) to verify everything works.
Now let's go to the last step: the "Generated UI" settings.
Generated UI
From the Settings menu, the "Generated UI" tab lets you customize the script's arguments.
The UI is generated from the Script's main function signature, but you can add additional constraints here. For example, we could use the Customize property: add a regex by clicking on Pattern to make sure users are providing a name with only alphanumeric characters: ^[A-Za-z0-9]+$. Let's still allow numbers in case you are some tech billionaire's kid.
Workflows as code
One way to write distributed programs that execute distinct jobs is to use flows that chain scripts together.
Another approach is to write a program that defines the jobs and their dependencies, and then execute that program directly in your script. This is known as workflows as code.

All details at:
Run!
We're done! Now let's look at what users of the script will do. Click on the Deploy button to load the script. You'll see the user input form we defined earlier.
Note that Scripts are versioned in Windmill, and each script version is uniquely identified by a hash.
Fill in the input field, then hit "Run". You should see a run view, as well as your logs. All script runs are also available in the Runs menu on the left.
You can also choose to run the script from the CLI with the pre-made Command-Line Interface call.
Caching
Every dependency on Python is cached on disk by default. Furtherfore if you use the Distributed cache storage, it will be available to every other worker, allowing fast startup for every worker.
What's next?
This script is a minimal working example, but there's a few more steps that can be useful in a real-world use case:
- Pass variables and secrets to a script.
- Connect to resources.
- Trigger that script in many ways.
- Compose scripts in Flows, low-code apps or full-code apps.
- You can share your scripts with the community on Windmill Hub. Once submitted, they will be verified by moderators before becoming available to everyone right within Windmill.
Scripts are immutable and there is an hash for each deployment of a given script. Scripts are never overwritten and referring to a script by path is referring to the latest deployed hash at that path.
For each script, a UI is autogenerated from the jsonchema inferred from the script signature, and can be customized further as standalone or embedded into rich UIs using the App builder.
In addition to the UI, sync and async webhooks are generated for each deployment.