Instance settings
Instance settings are accessible to all superadmins of your Windmill instance. This is where you manage settings and features across all workspaces. One instance can have several workspaces.
This is from the Instance settings that you can see on which Windmill version your instance is running.
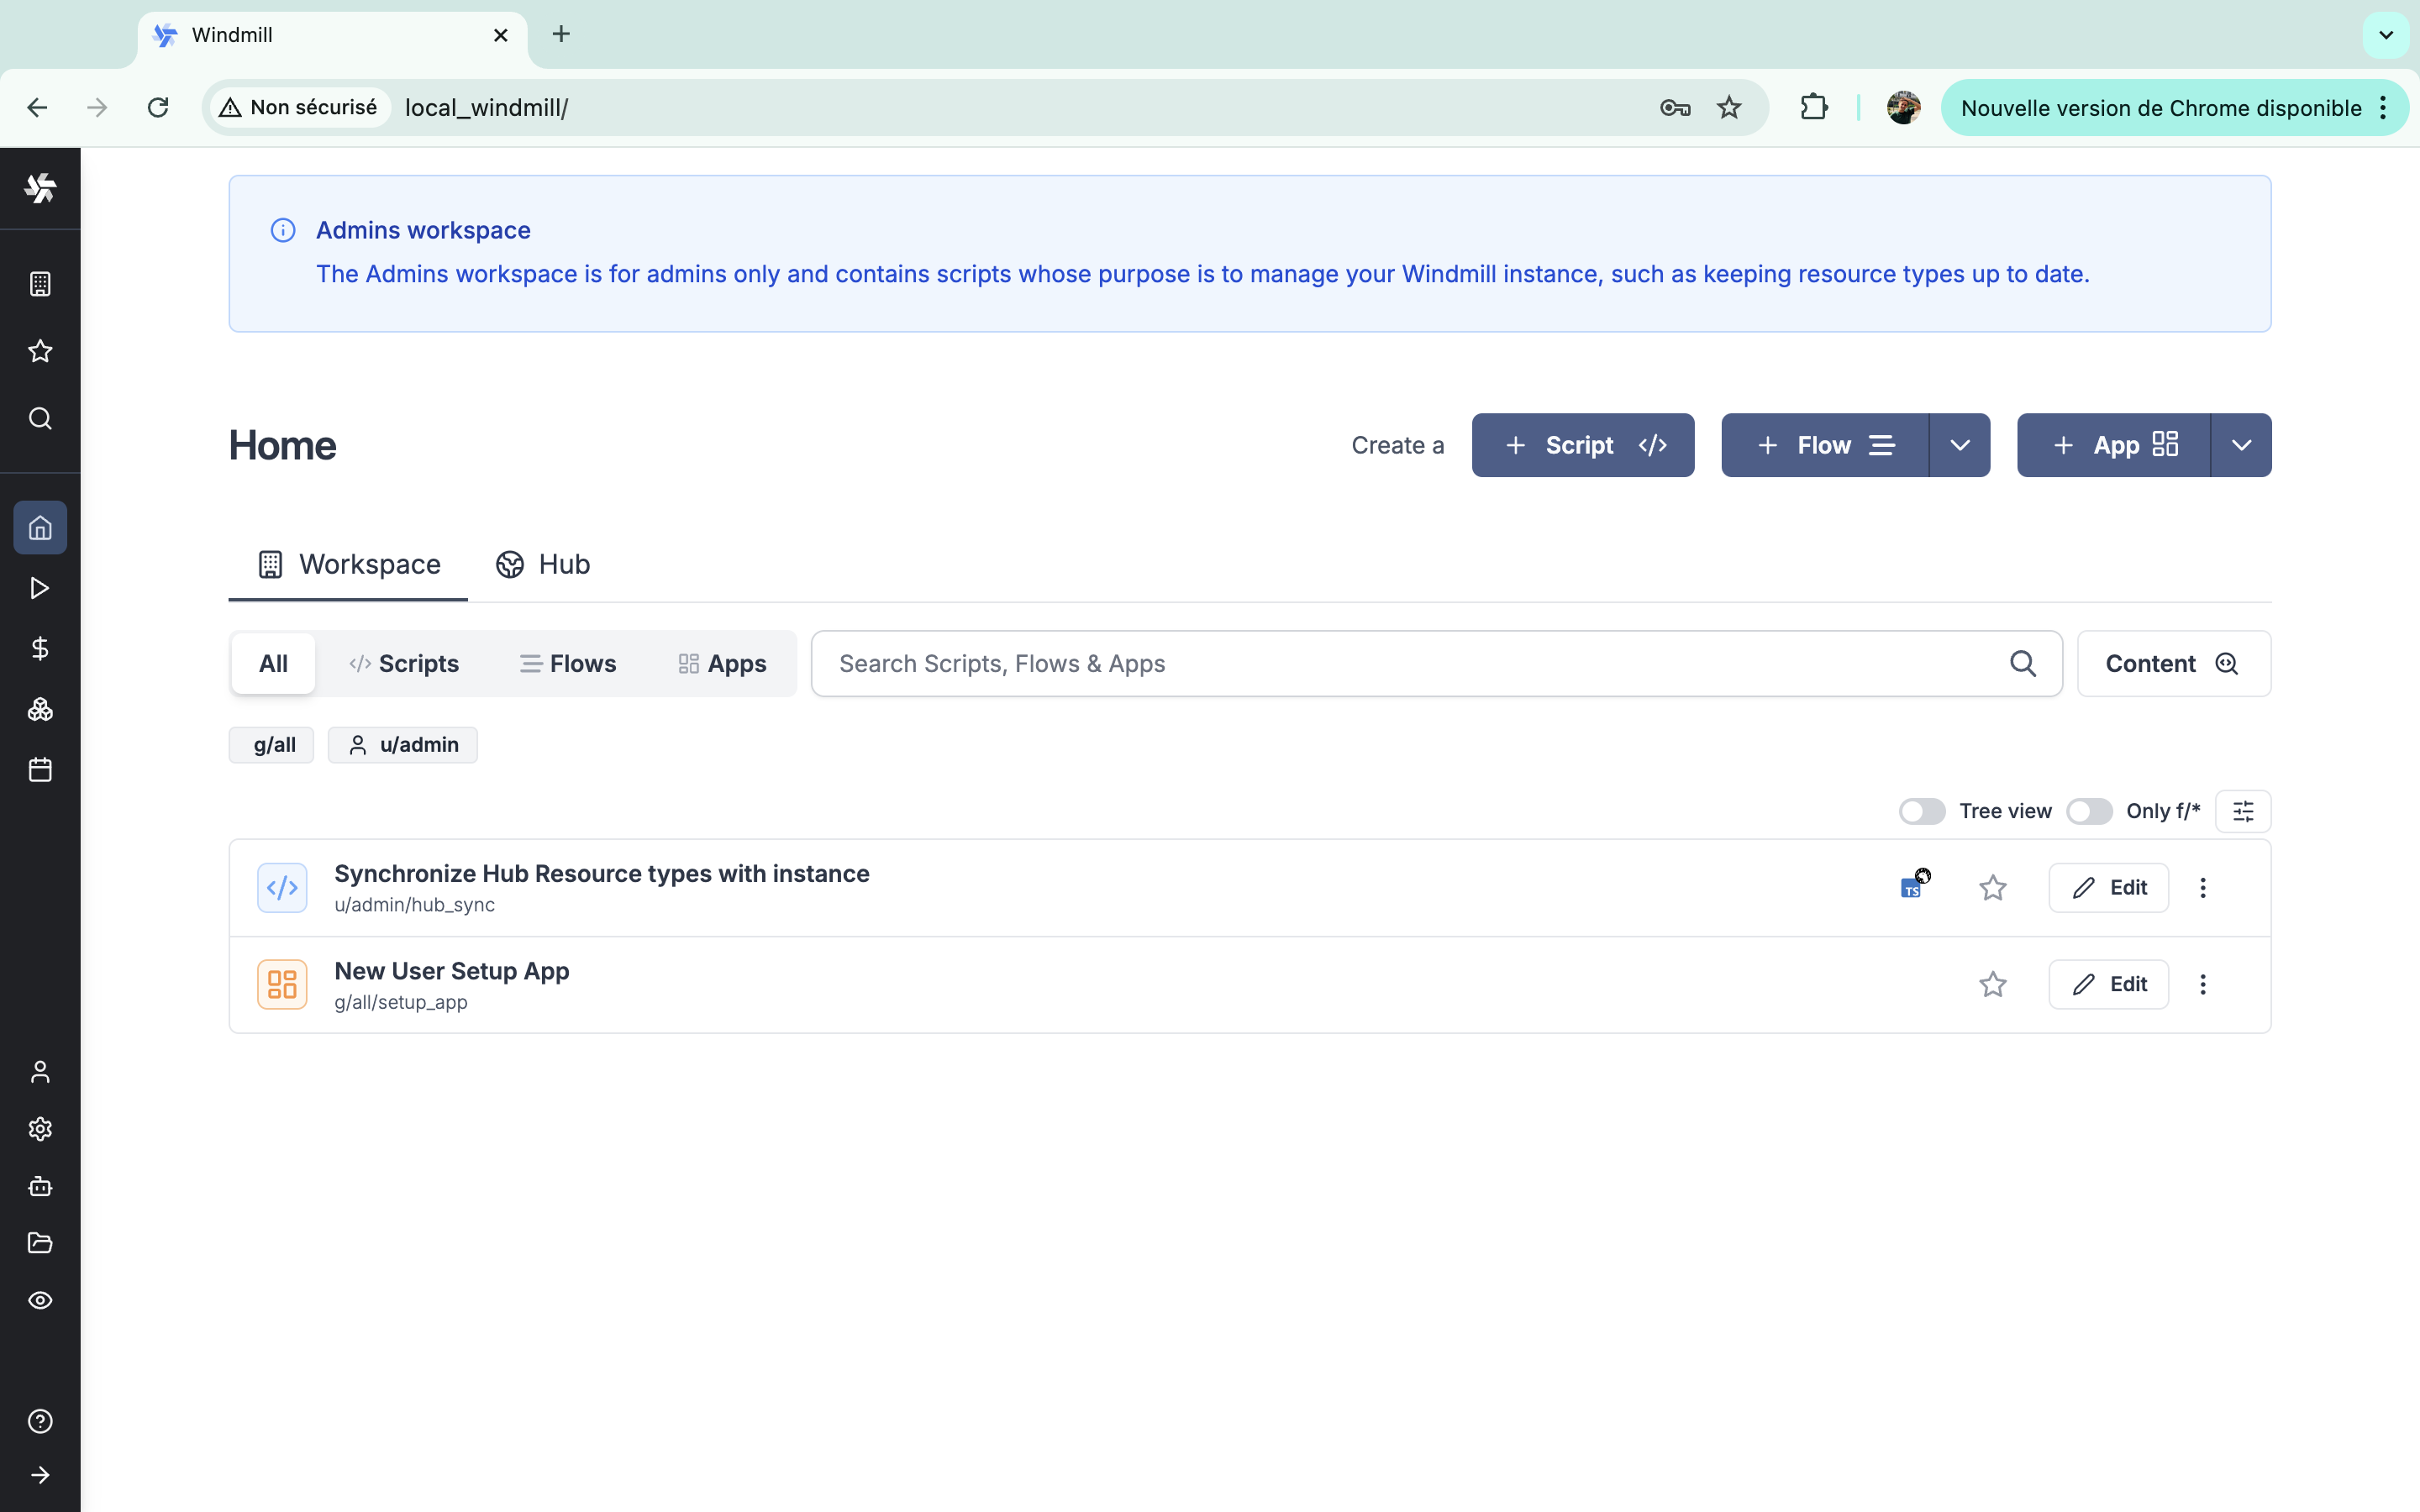
Admins workspace
The Admins workspace is for superadmins only and contains scripts whose purpose is to manage your Windmill instance, such as keeping resource types up to date or the New User Setup App.
The resources types created from the Admins workspace are shared across all workspaces.
You can access it from the list of workspaces or from Instance settings.
Global users
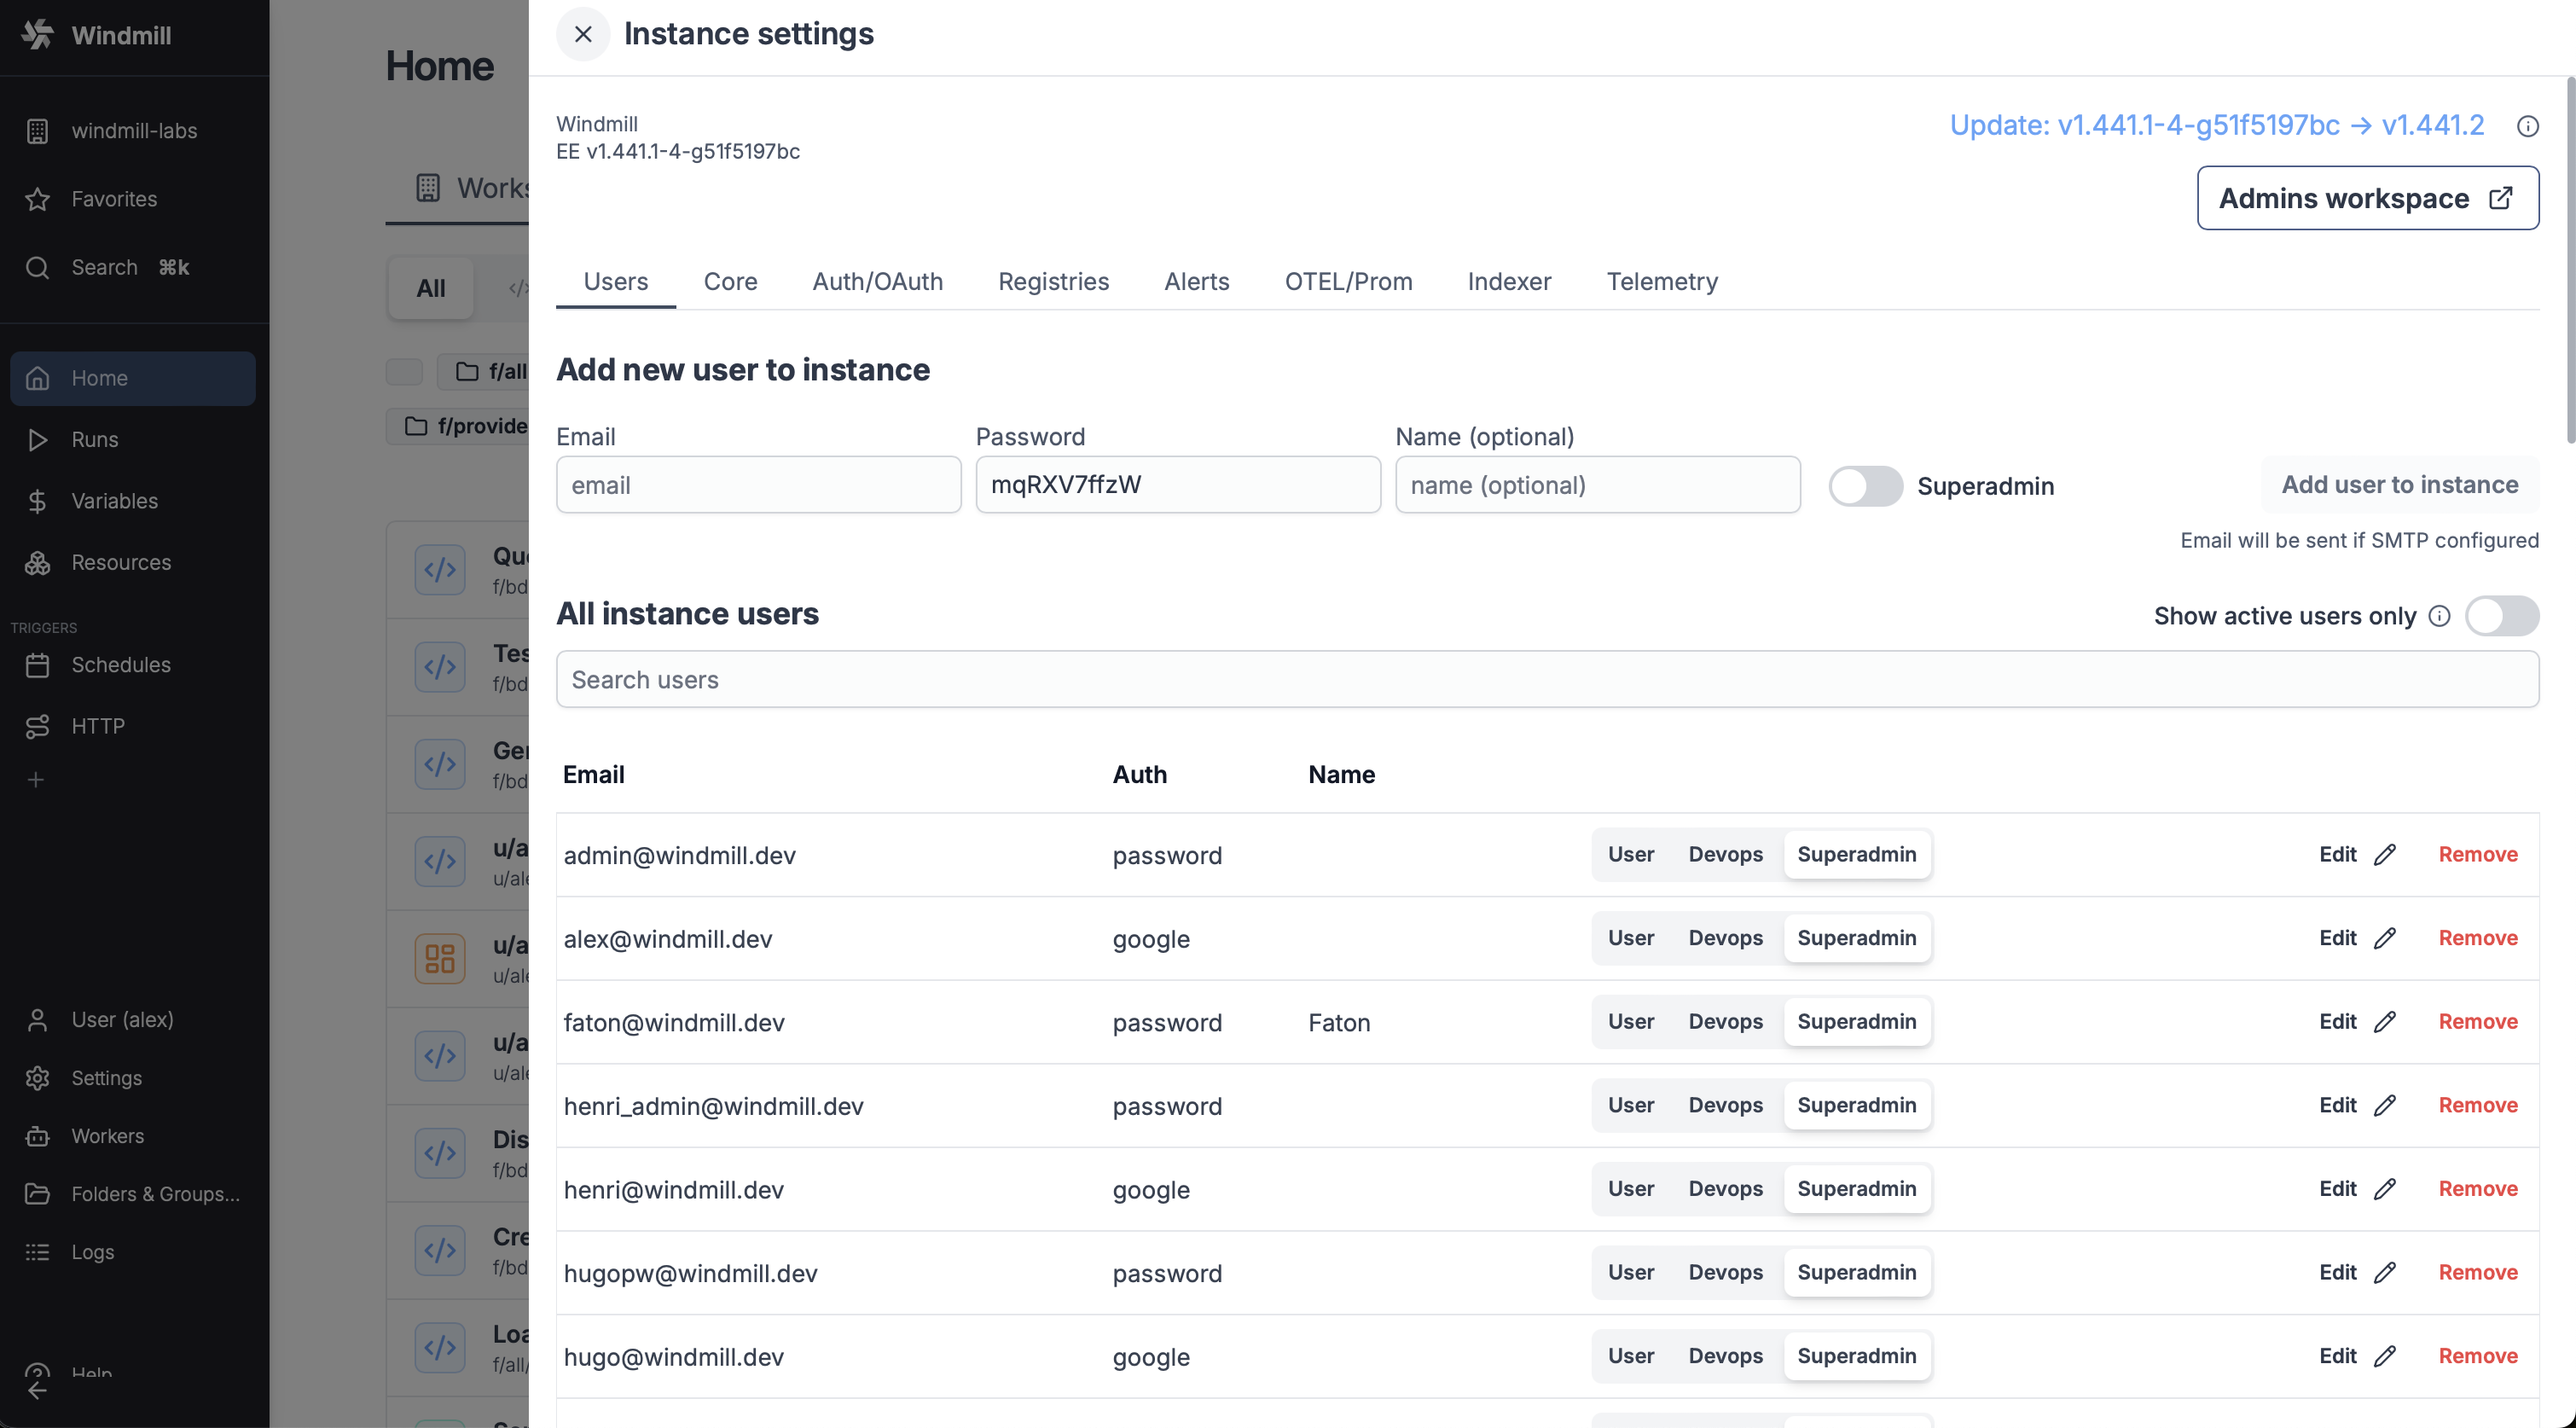
Global Users are users of the Windmill instance. They are not associated with any workspace and can be assigned to any workspace (from the workspace settings).
From there you can manually add a user to the instance, giving an email and a password. Users can be set to User, Devops or Superadmin roles.
You can also enable automatic username creation from emails. Usernames will be shared accross workspaces. We recommend setting it to avoid duplicated usernames.
A more common way to add users is to use SSO/OAuth.
For each user, you can see Email, Auth (manually-set password or Auth methods), Name, Kind (Developer or Operator where an operator at the instace level is an operator in all workspaces they are members of), and Role (User or Superadmin).
You can also toggle on 'Show active users only' to show only users who have performed at least one action in the last 30 days. Only those users are counted in our Pricing.
Core
Base url
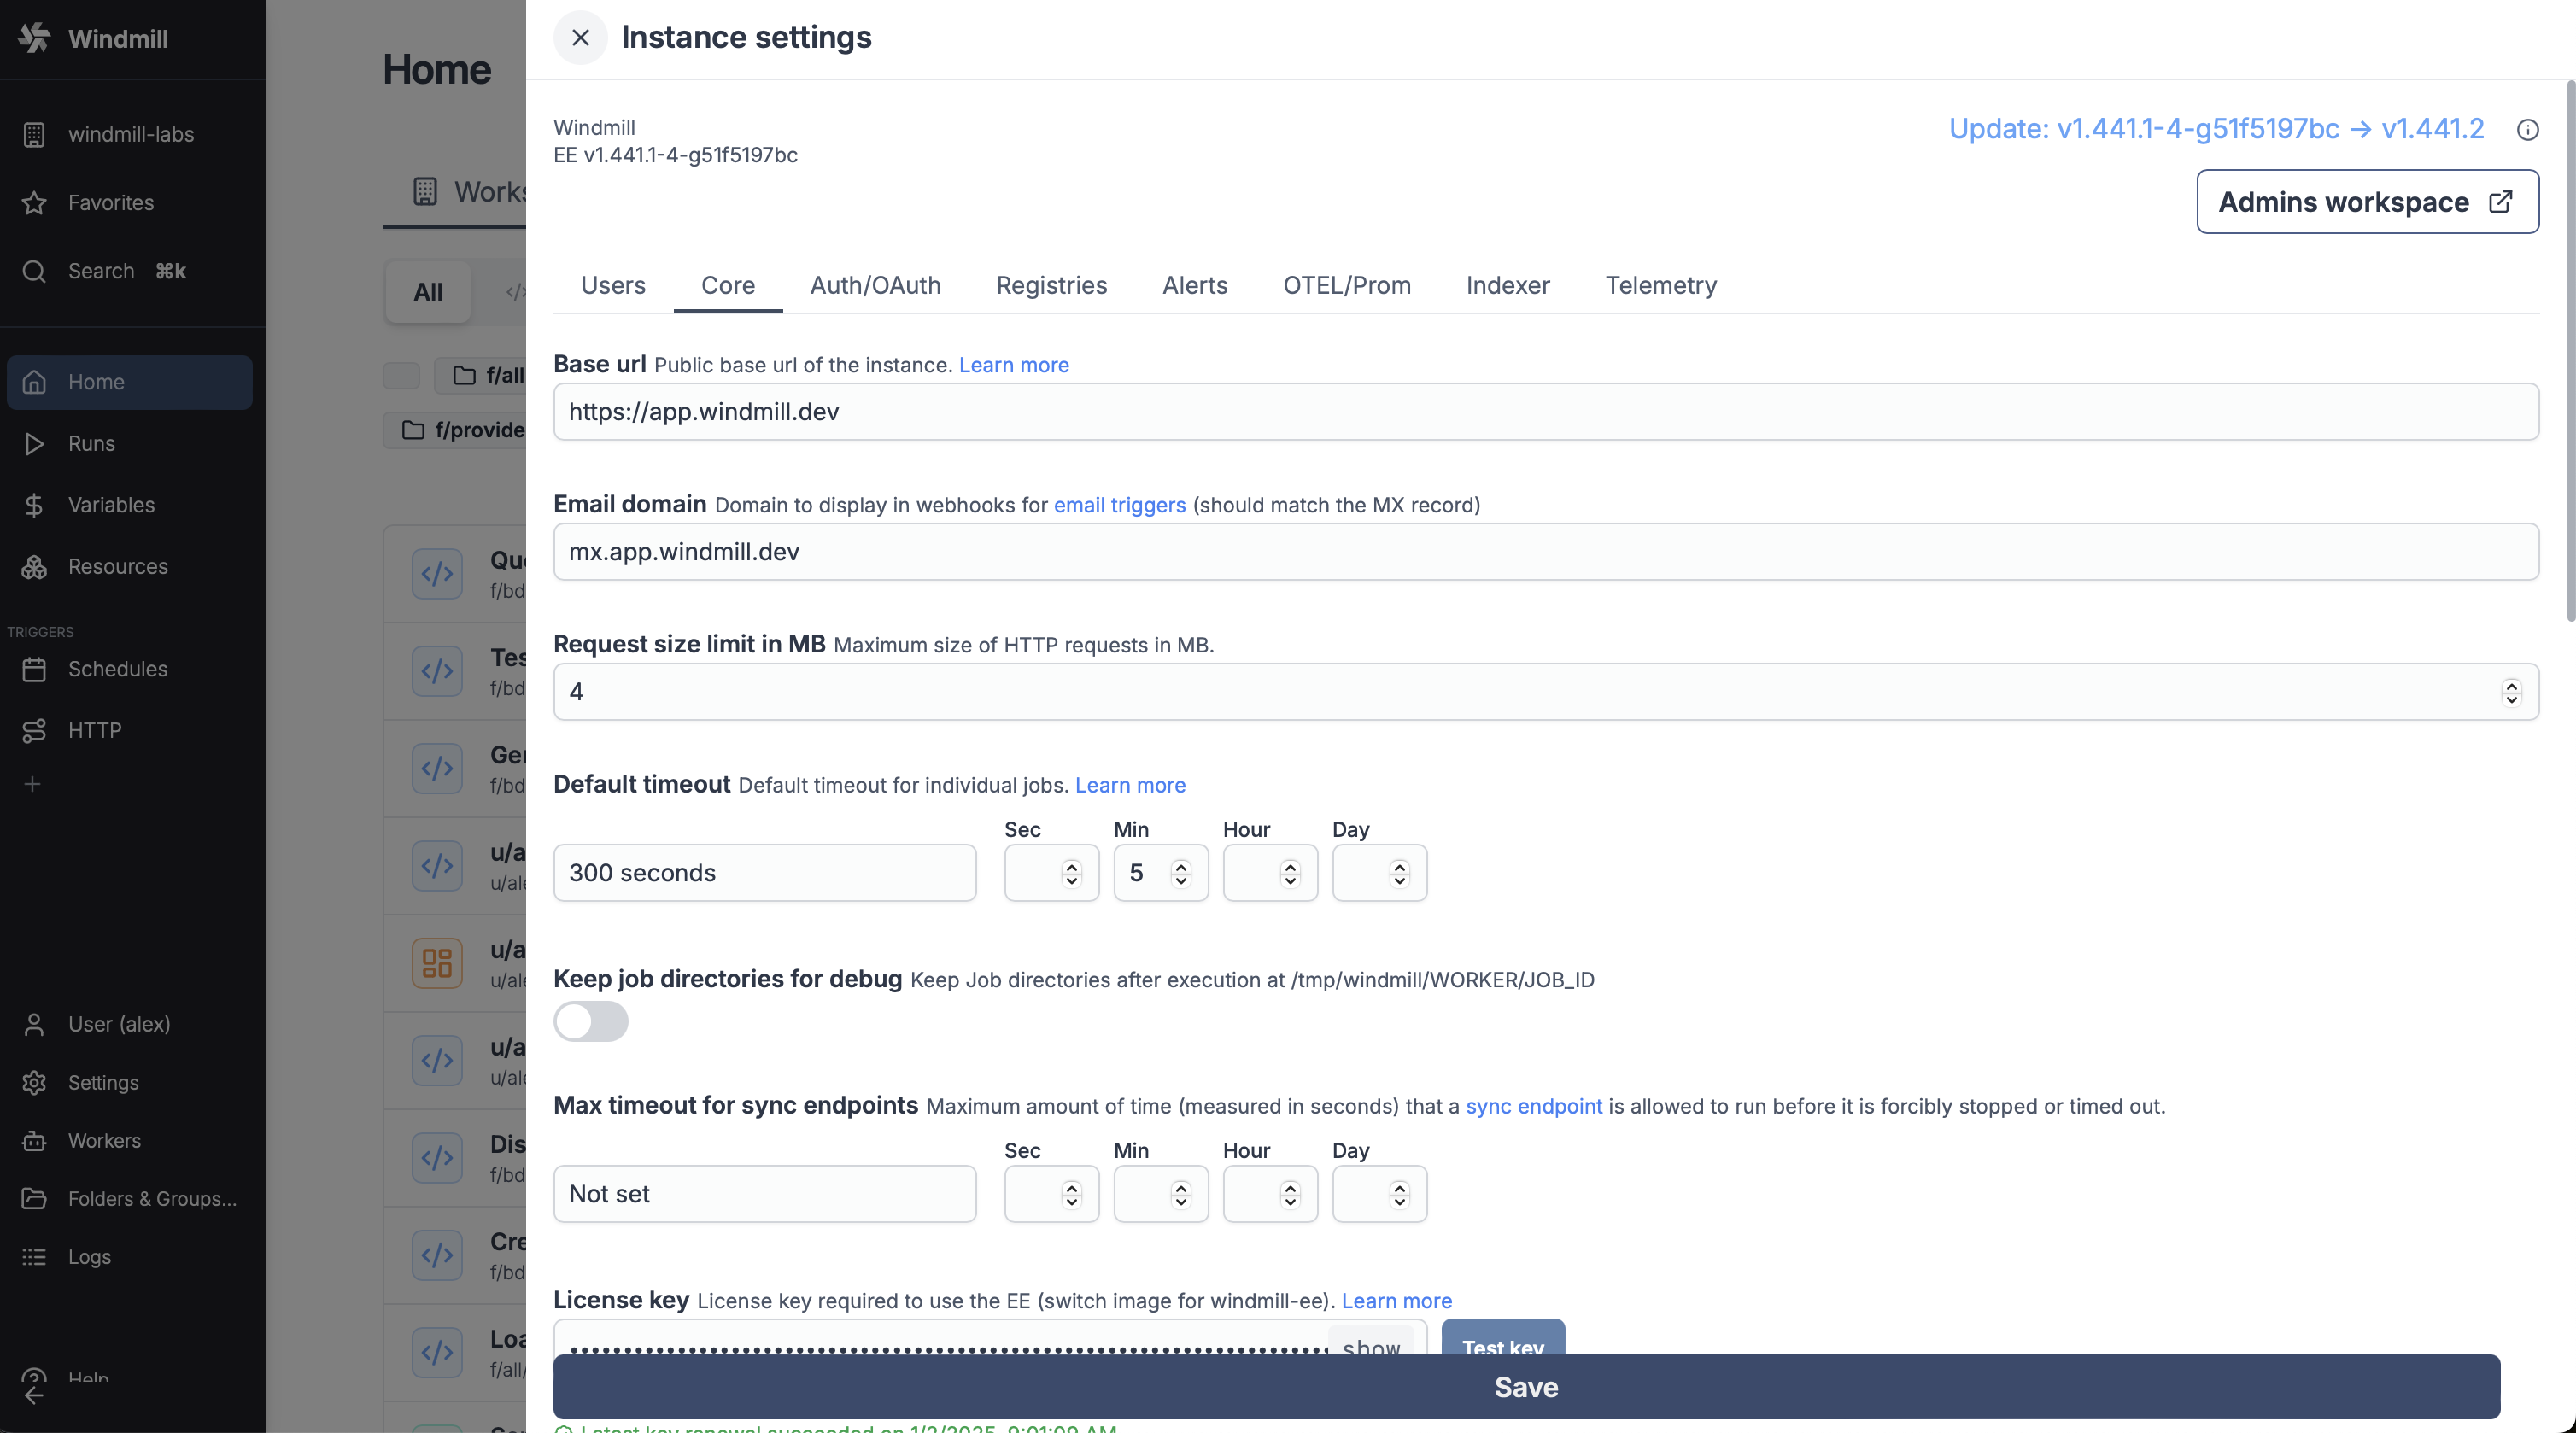
The base URL is the public base url of the instance.
If the base URL is not set correctly, some server-side generated URLs like resume URLs will be incorrect. Additionally, OAuth and SSO functionalities will not work properly.
Email domain
Domain to display in webhooks for email triggers (should match the MX record).
Request size limit in MB
Maximum size of HTTP requests in MB. Cloud only.
Default timeout
Default timeout for individual jobs, in seconds.
You will find a helper to convert days, hours, minutes, and seconds to seconds.
Note that you can set a custom timeout for flow steps.
Max timeout for sync endpoints
Maximum amount of time (measured in seconds) that a sync endpoint is allowed to run before it is forcibly stopped or timed out.
You will find a helper to convert days, hours, minutes, and seconds to seconds.
Keep job directories for debug
Toogle to keep Job directories after execution at /tmp/windmill/<worker>/<job_id>.
License key
The license key is used to enable Enterprise Edition. You can get one by starting a free trial from the pricing page or by contacting us at [email protected]
To see how to upgrade your instance to Enterprise Edition, see the Upgrade to Enterprise Edition docs.
A same key can also be used for non-prod instances. Just make sure to set the Non-prod instance to true so that the computation usage is not counted in the billing.
From there you also have two buttons:
Renew key: to renew the license key (as long as you have a valid subscription). Anyway, the key is automatically renewed everyday as long as your subscription is valid.Open customer portal: the recommended way to access the Customer portal where you can manage your subscription.
If your subscription is active, the key is automatically renewed everyday. A key is typically valid for 35 days.
Non-prod instance
Whether we should consider the reported usage of this instance as non-prod.
Non-prod instances work the same as prod instances in terms of features, but their computation usage is not counted in the billing. Seats count, however, are across all instances. If all instances using the same key are 'Non-prod', the one using most Compute Units will be counted as Prod.
Alternatively, you can copy a development license key using the dedicated button from the Customer portal. This provides an alternative to manually turning instances to Non-prod mode.
This setting is only available on Enterprise Edition.
Retention period in secs
How long to keep the jobs data (especially the audit logs) in the database (max 30 days on Community Edition).
You will find a helper to convert days, hours, minutes, and seconds to seconds.
This setting is only available on Enterprise Edition.
Instance object storage
Connect your instance to a S3 bucket to store large logs and global cache for Python and Go.
This feature has no overlap with the Workspace object storage.
You can choose to use S3, Azure Blob Storage, AWS OIDC or Google Cloud Storage. For each you will find a button to test settings from a server or from a worker.
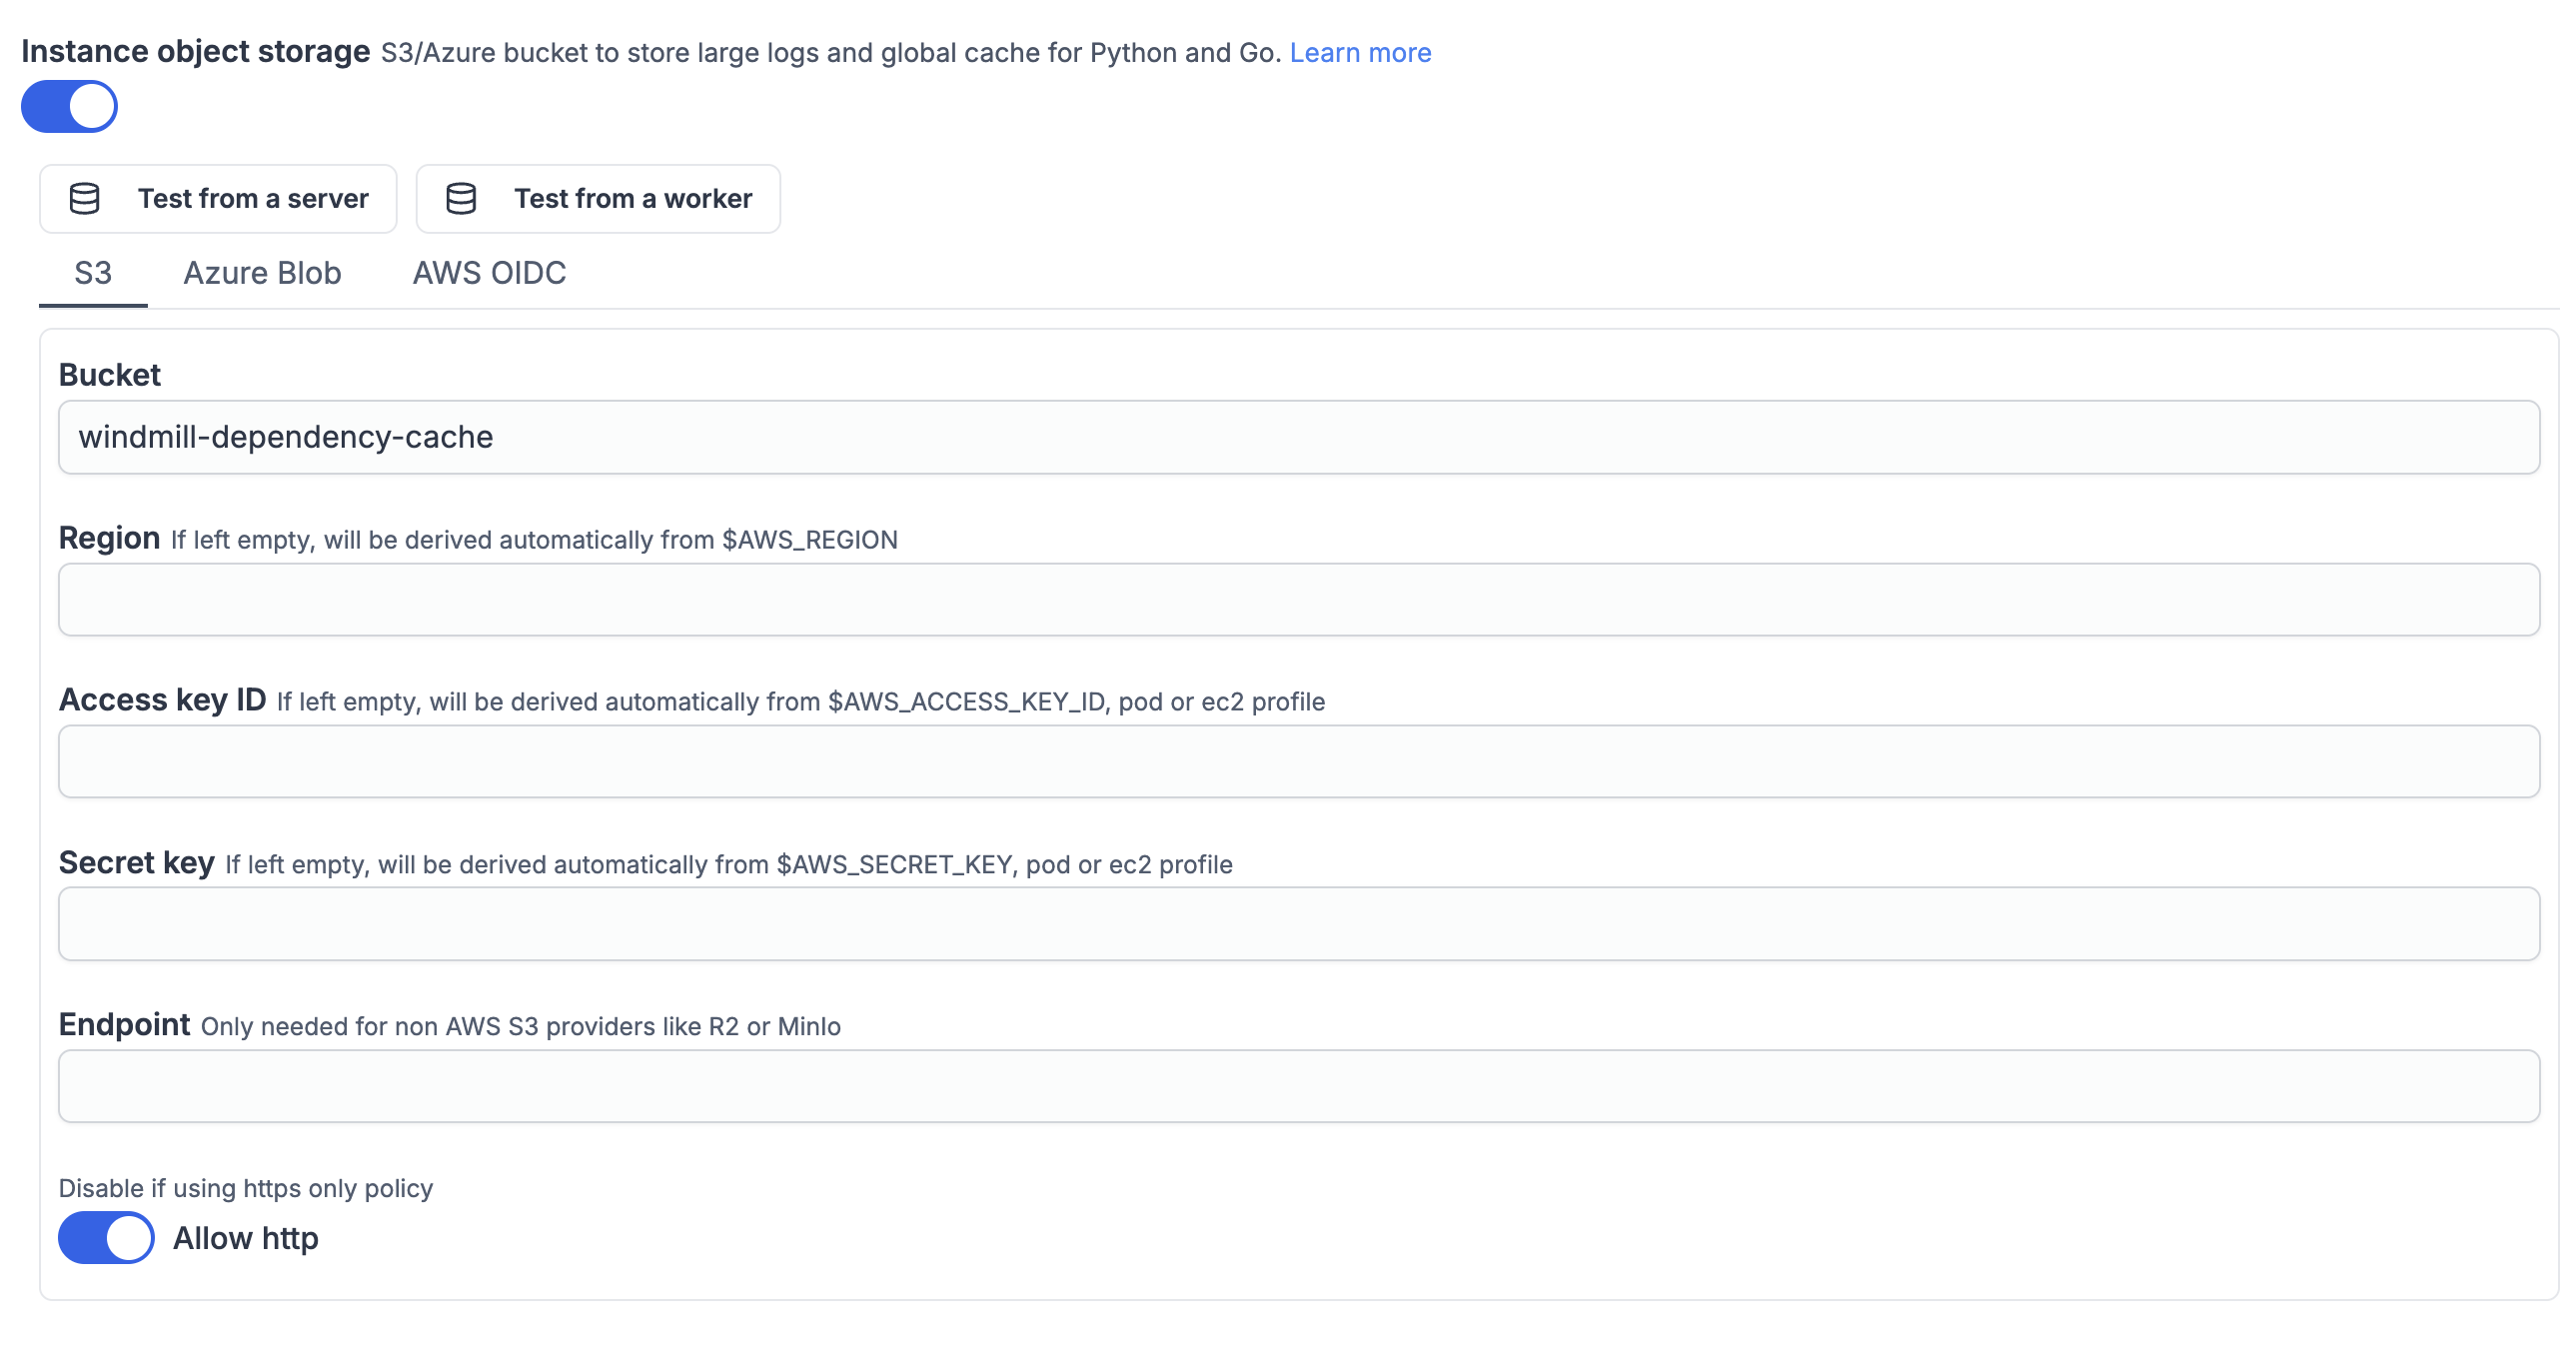
S3
| Field | Description |
|---|---|
| Bucket | The name of your S3 bucket |
| Region | If left empty, will be derived automatically from $AWS_REGION |
| Access key ID | If left empty, will be derived automatically from $AWS_ACCESS_KEY_ID, pod or ec2 profile |
| Secret key | If left empty, will be derived automatically from $AWS_SECRET_KEY, pod or ec2 profile |
| Endpoint | Only needed for non AWS S3 providers like R2 or MinIo |
| Allow http | Disable if using https only policy |
Azure Blob
| Field | Description |
|---|---|
| Account name | The name of your Azure storage account |
| Container name | The name of your Azure blob container |
| Access key | Your Azure storage account access key |
| Tenant ID | (Optional) Your Azure tenant ID |
| Client ID | (Optional) Your Azure client ID |
| Endpoint | (Optional) Only needed for non Azure Blob providers like Azurite |
AWS OIDC
| Field | Description |
|---|---|
| Bucket | The name of your S3 bucket |
| Region | The AWS region where your bucket is located |
| Role ARN | The ARN of the IAM role to assume (e.g., arn:aws:iam::123456789012:role/test) |
This setting is only available on Enterprise Edition.
Google Cloud Storage
| Field | Description |
|---|---|
| Bucket | The name of your Google Cloud Storage bucket |
| Service Account Key | The service account key for your Google Cloud Storage bucket in JSON format |
Private Hub base url
Base url of your Private Hub instance, without trailing slash.
The url above will be used both when accesing the hub from the instance and from the user browser. If end users cannot access the Private Hub with the url above, you can enable the toggle just below the field to set a different url for the Private Hub which is accessible to the users (Private Hub accessible url).
This setting is only available on Enterprise Edition.
Private hub api secret
Private Hub api secret. Only required if access to your Private Hub is restricted.
This setting is only available on Enterprise Edition.
Auth/OAuth
Windmill supports SSO/OAuth for user authentication. You can enable it from the Instance settings.
Single Sign On (SSO)
When at least one of the SSO options is set, users will be able to login to Windmill via their third-party account.
To test SSO, the recommended workflow is to to save the settings and try to login in an incognito window.
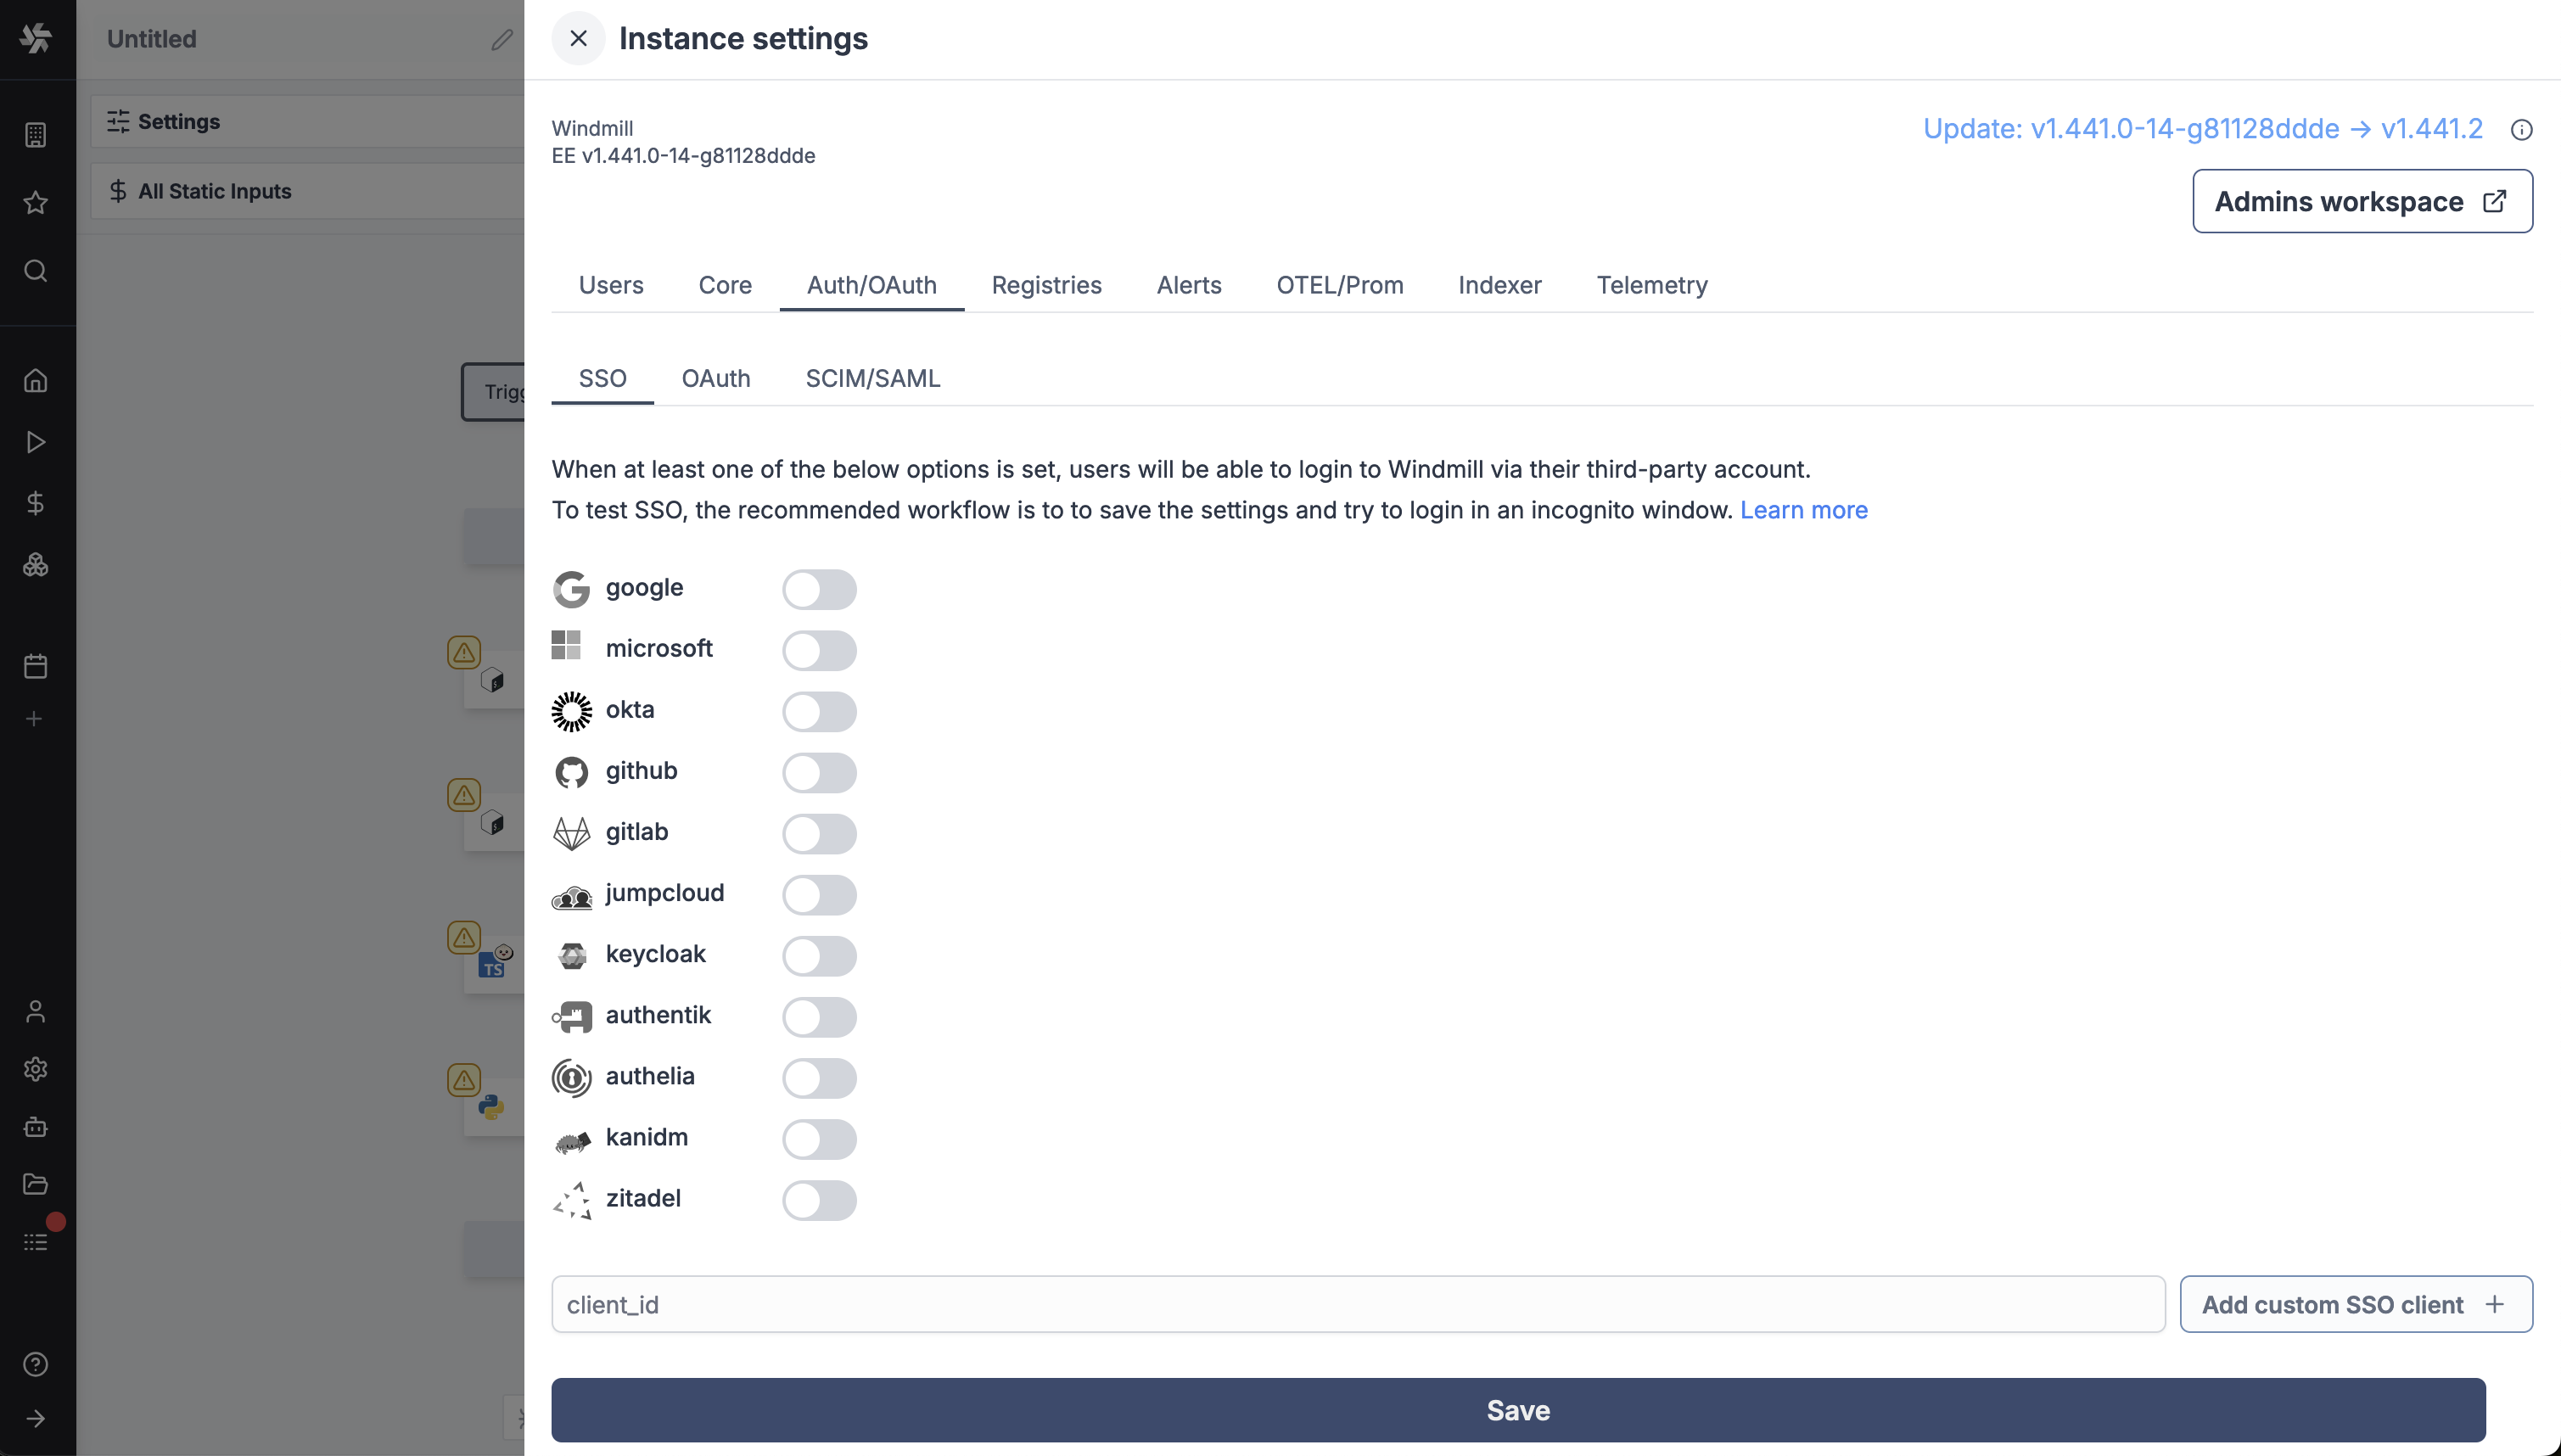
You can add a custom SSO client by providing a client id.
Also, from the instance settings you can enable toggle 'Require users to have been added manually to Windmill to sign in through OAuth'.
Without Enterprise Edition, the number of SSO users is limited to 10.
OAuth
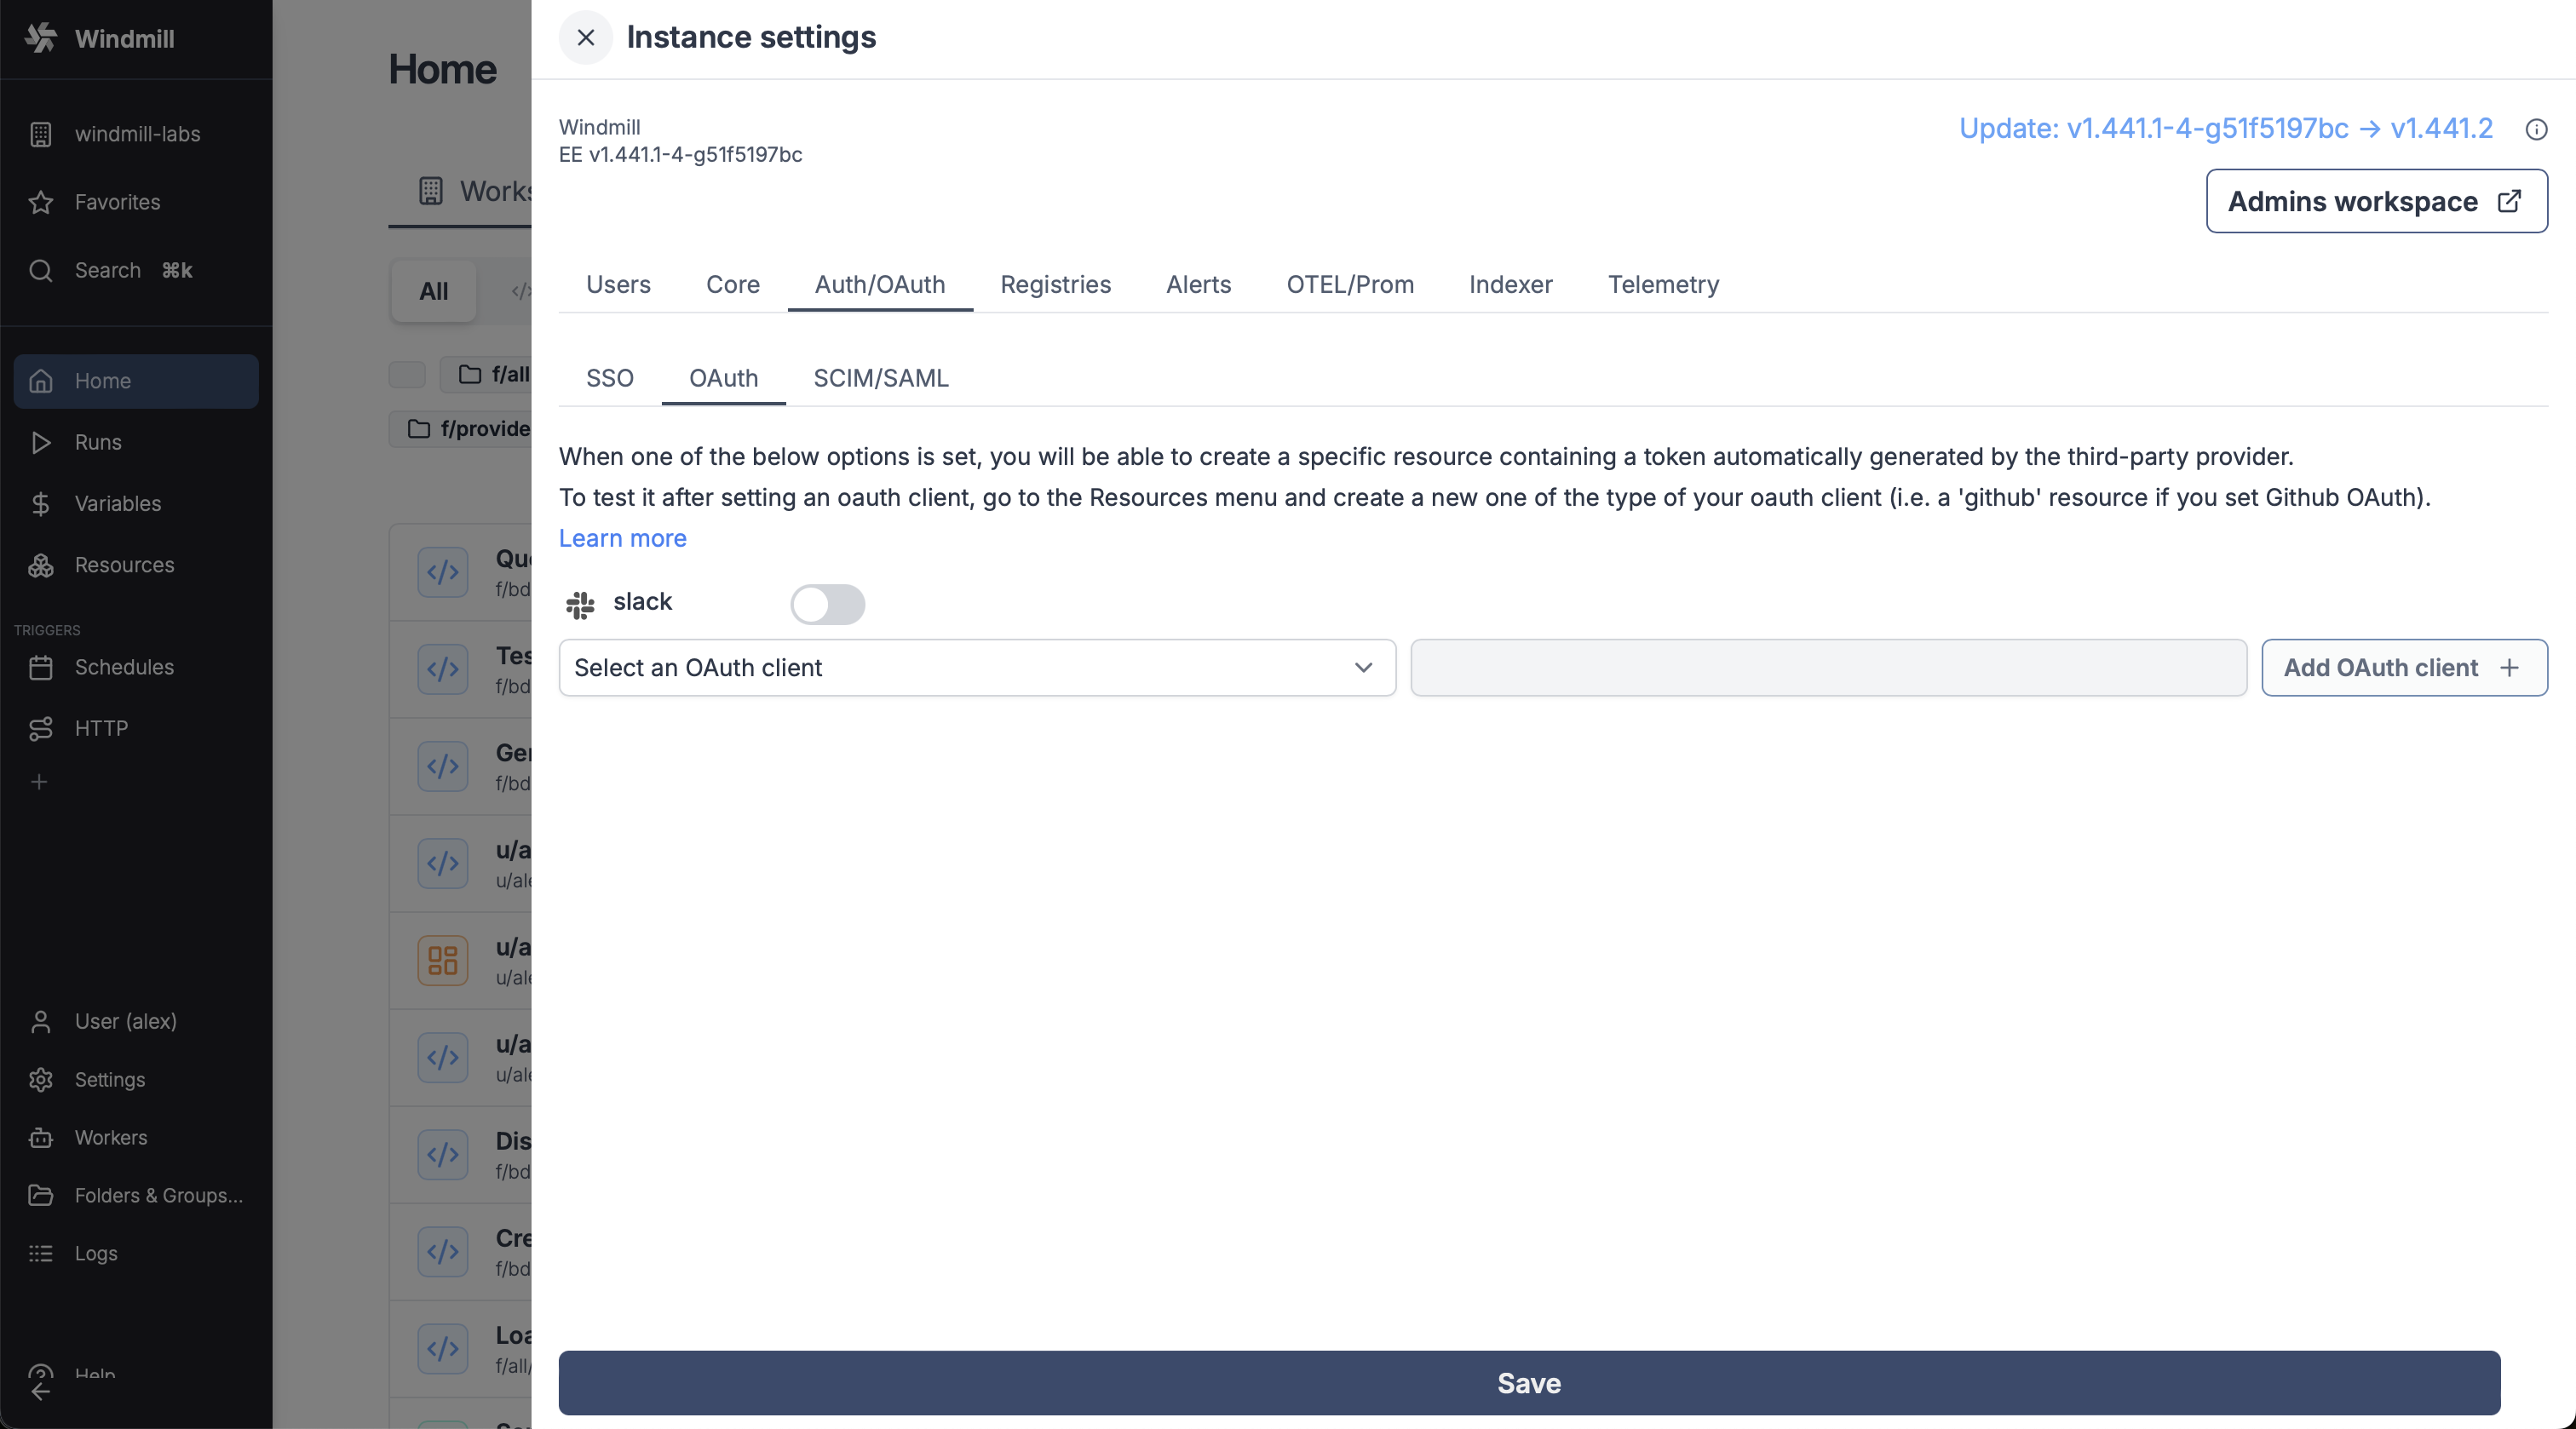
When one of the OAuth options is set, you will be able to create a specific resource containing a 'token' automatically generated by the third-party provider. To test it after setting an oauth client, go to the Resources menu and create a new one of the type of your oauth client (i.e. a 'github' resource if you set GitHub OAuth).
SCIM/SAML
Windmill supports SCIM and SAML for user provisioning and authentication.
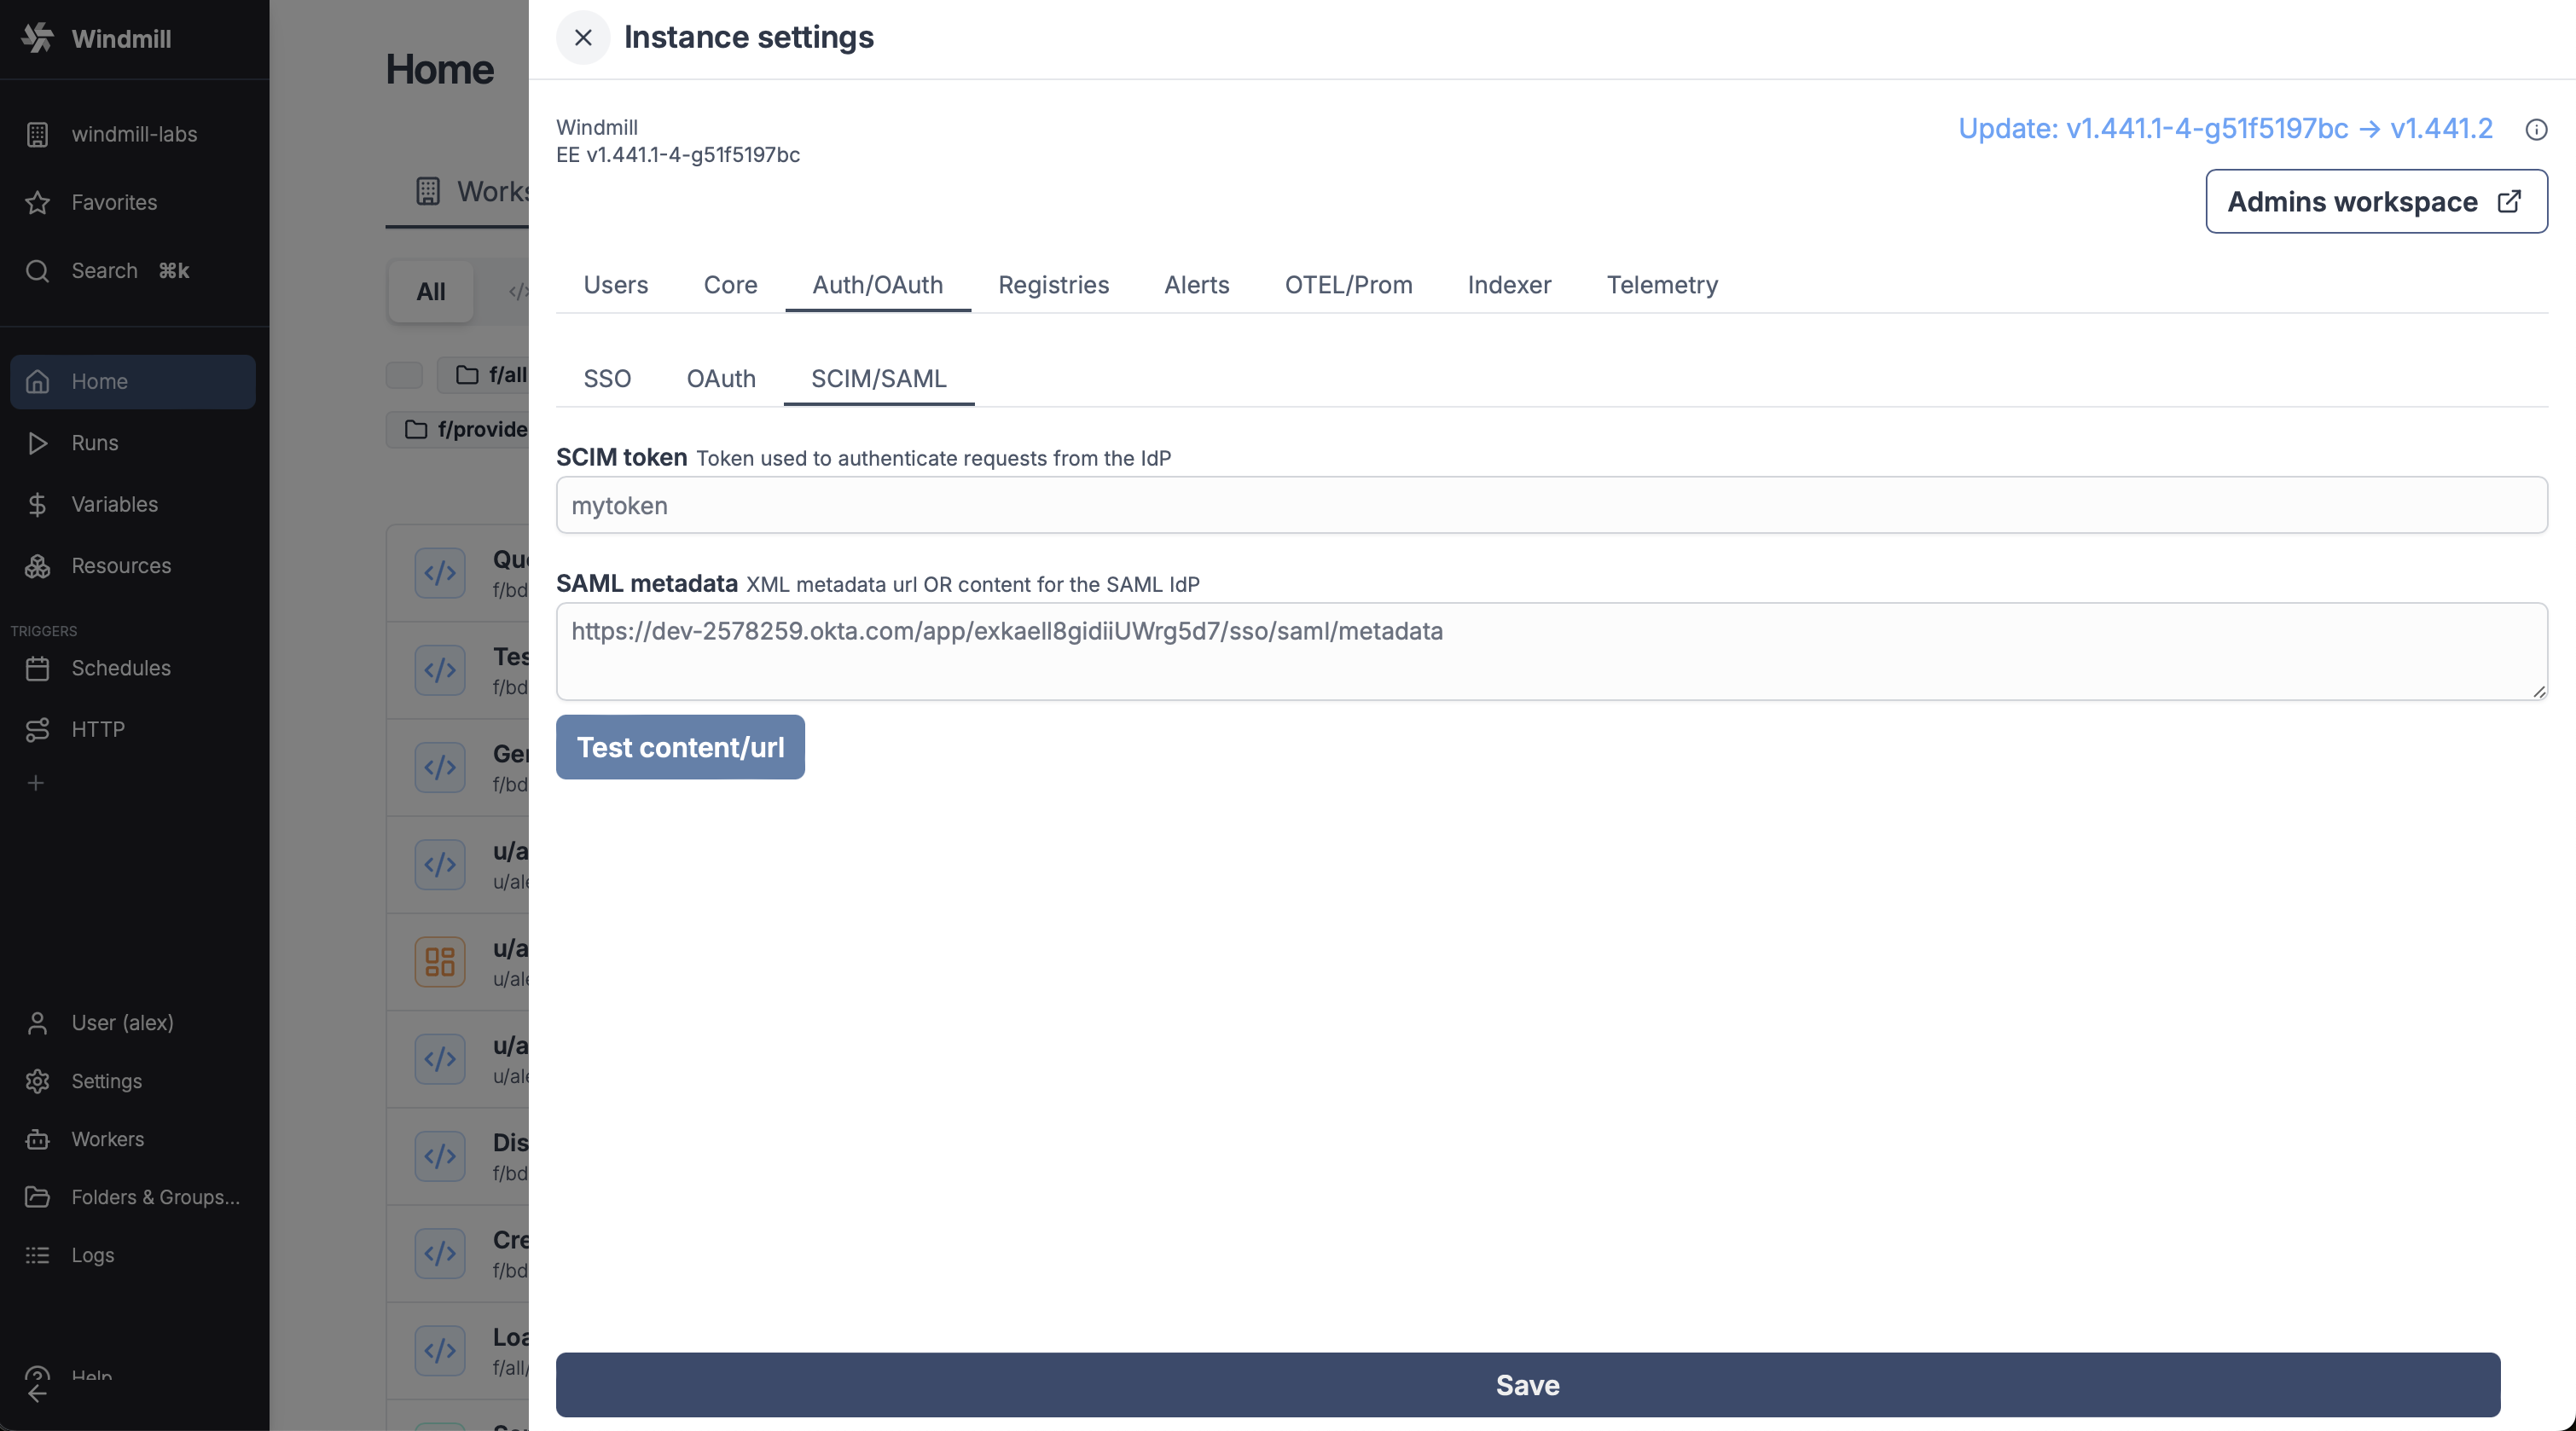
You can test settings with button 'Test content/url'.
These settings are only available on Enterprise Edition.
SCIM token
Token used to authenticate requests from the IdP.
SAML metadata
XML metadata url OR content for the SAML IdP.
Registries
Add private registries for UV, Bun, npm, Nuget, and PowerShell.
These settings are only available on Enterprise Edition.
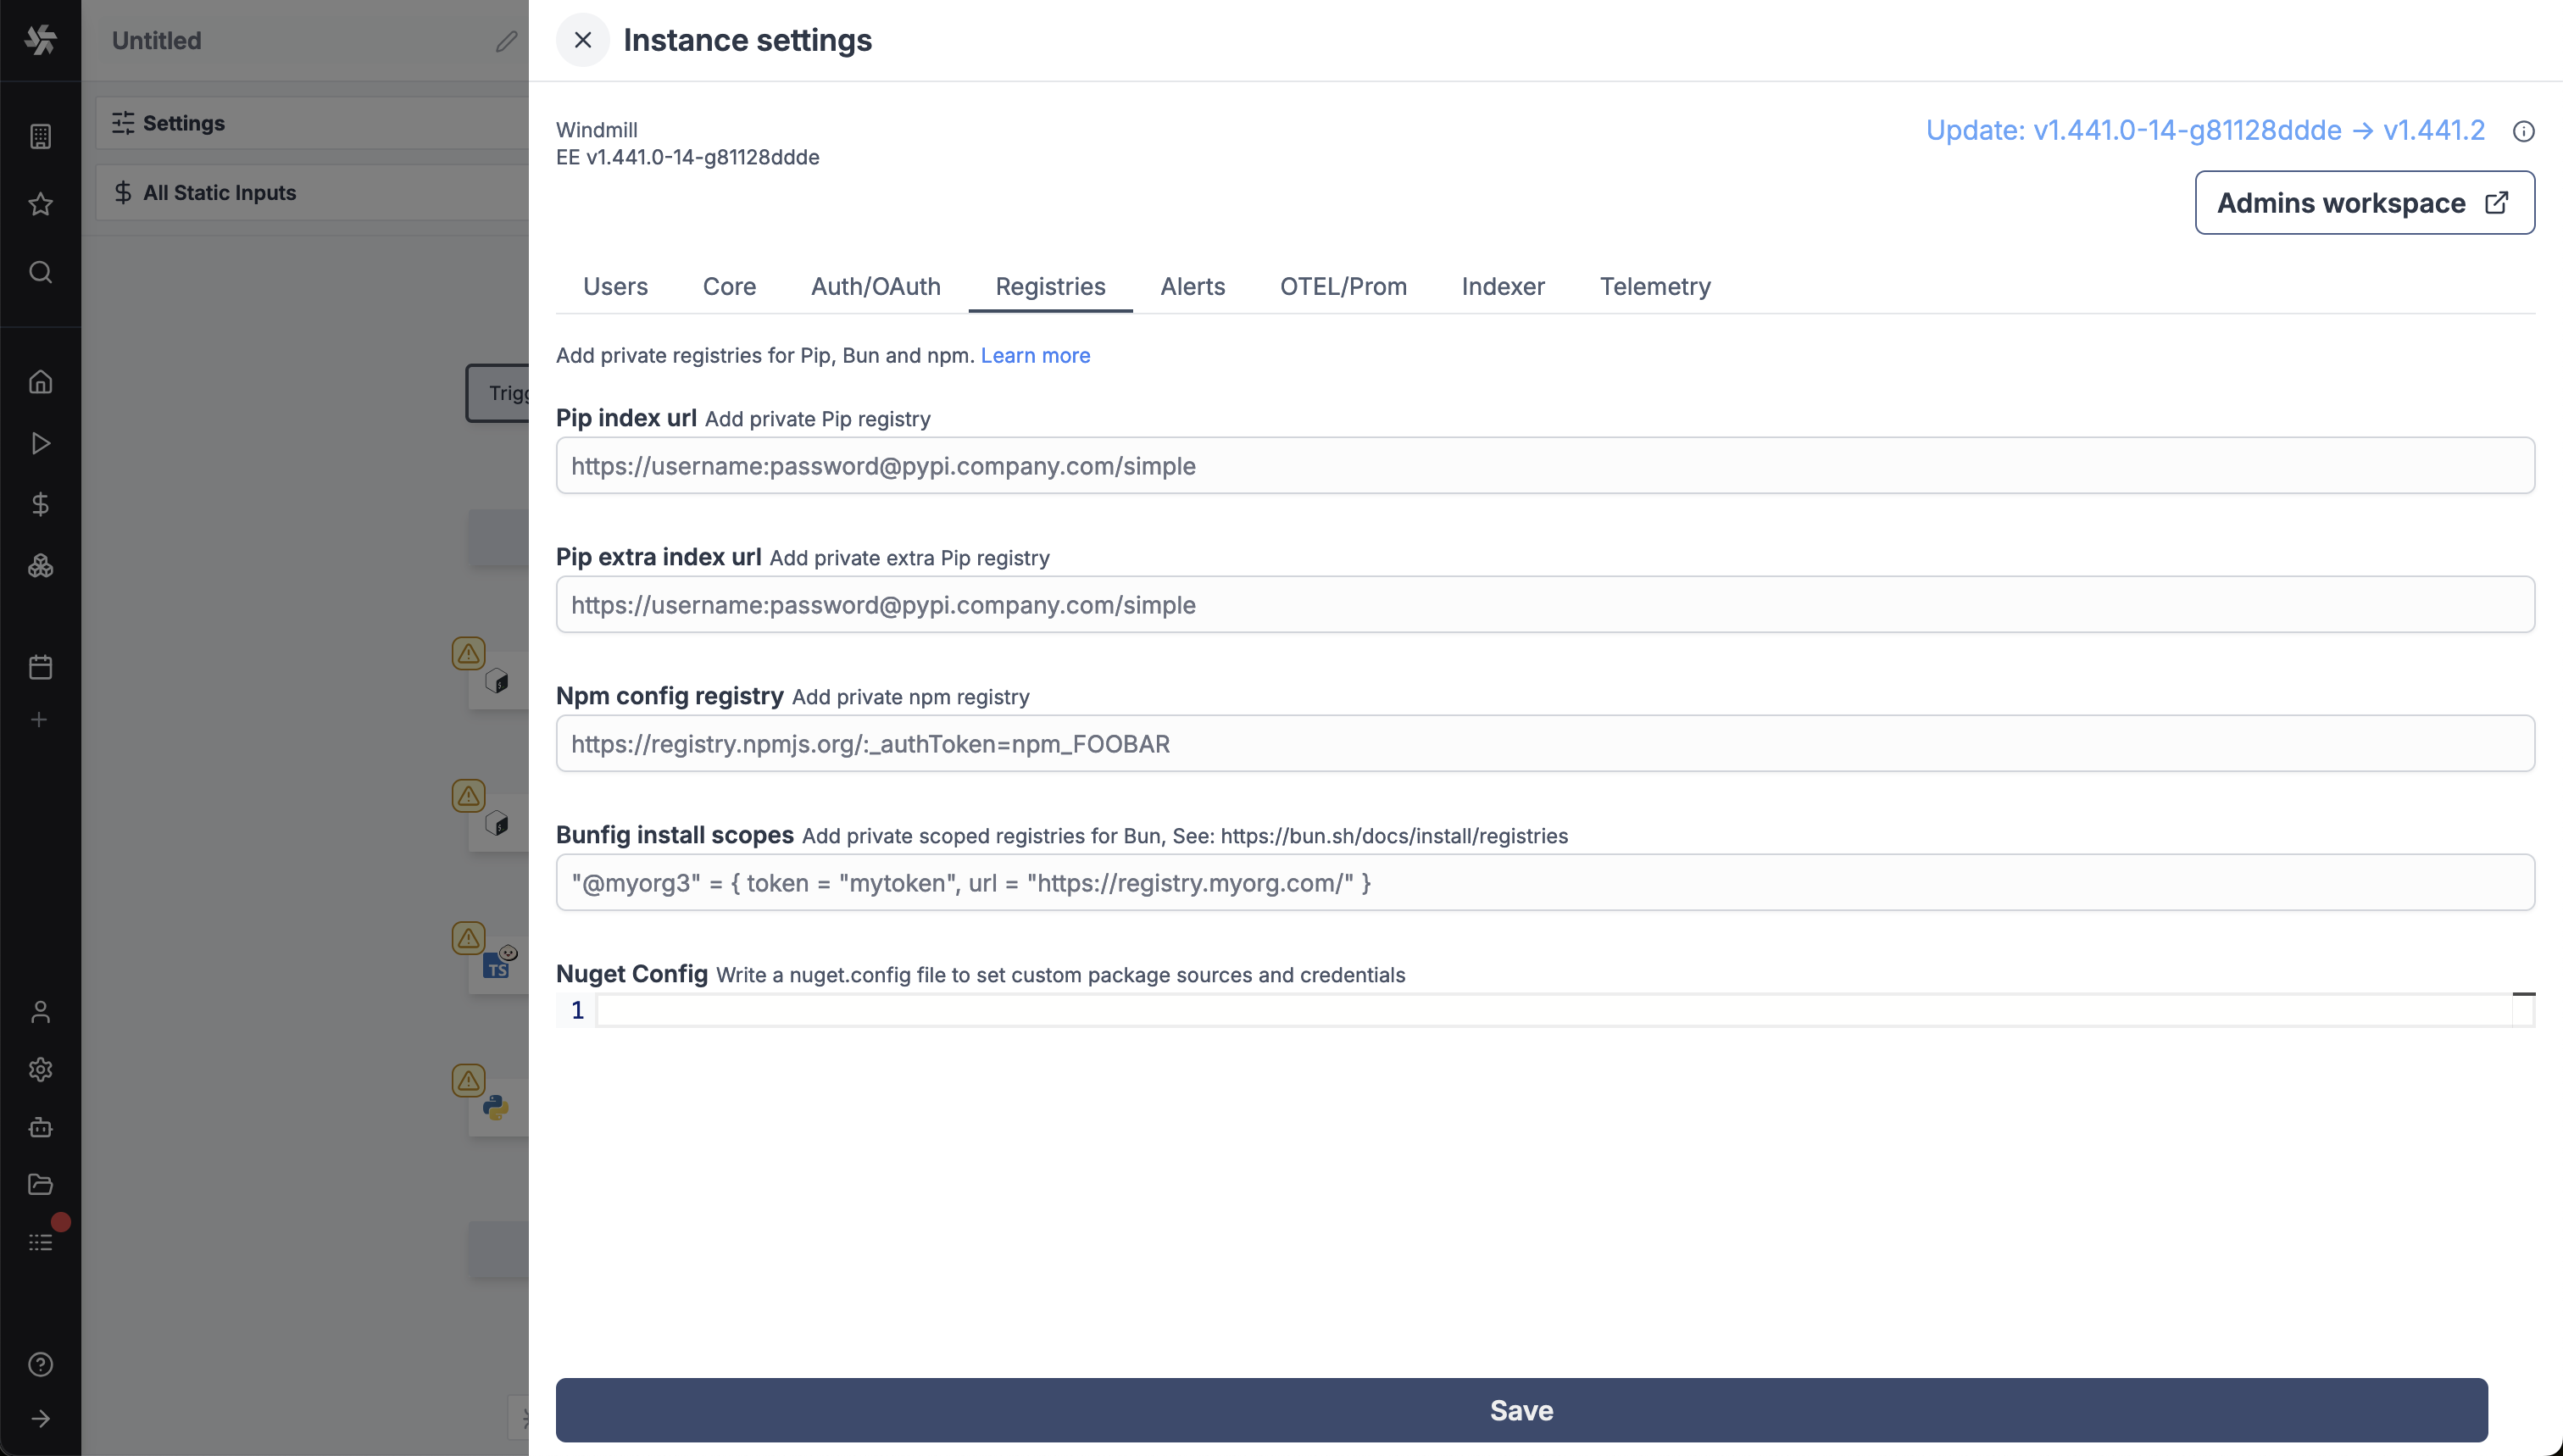
UV index url
Add private registry for python.
UV extra index url
Add private extra private registry for python.
Npm config registry
Add private NPM registry.
Bunfig install scopes
Add private scoped registries for Bun, See: https://bun.sh/docs/install/registries.
Nuget config
Write a nuget.config file to set custom/private package sources and credentials.
Alerts
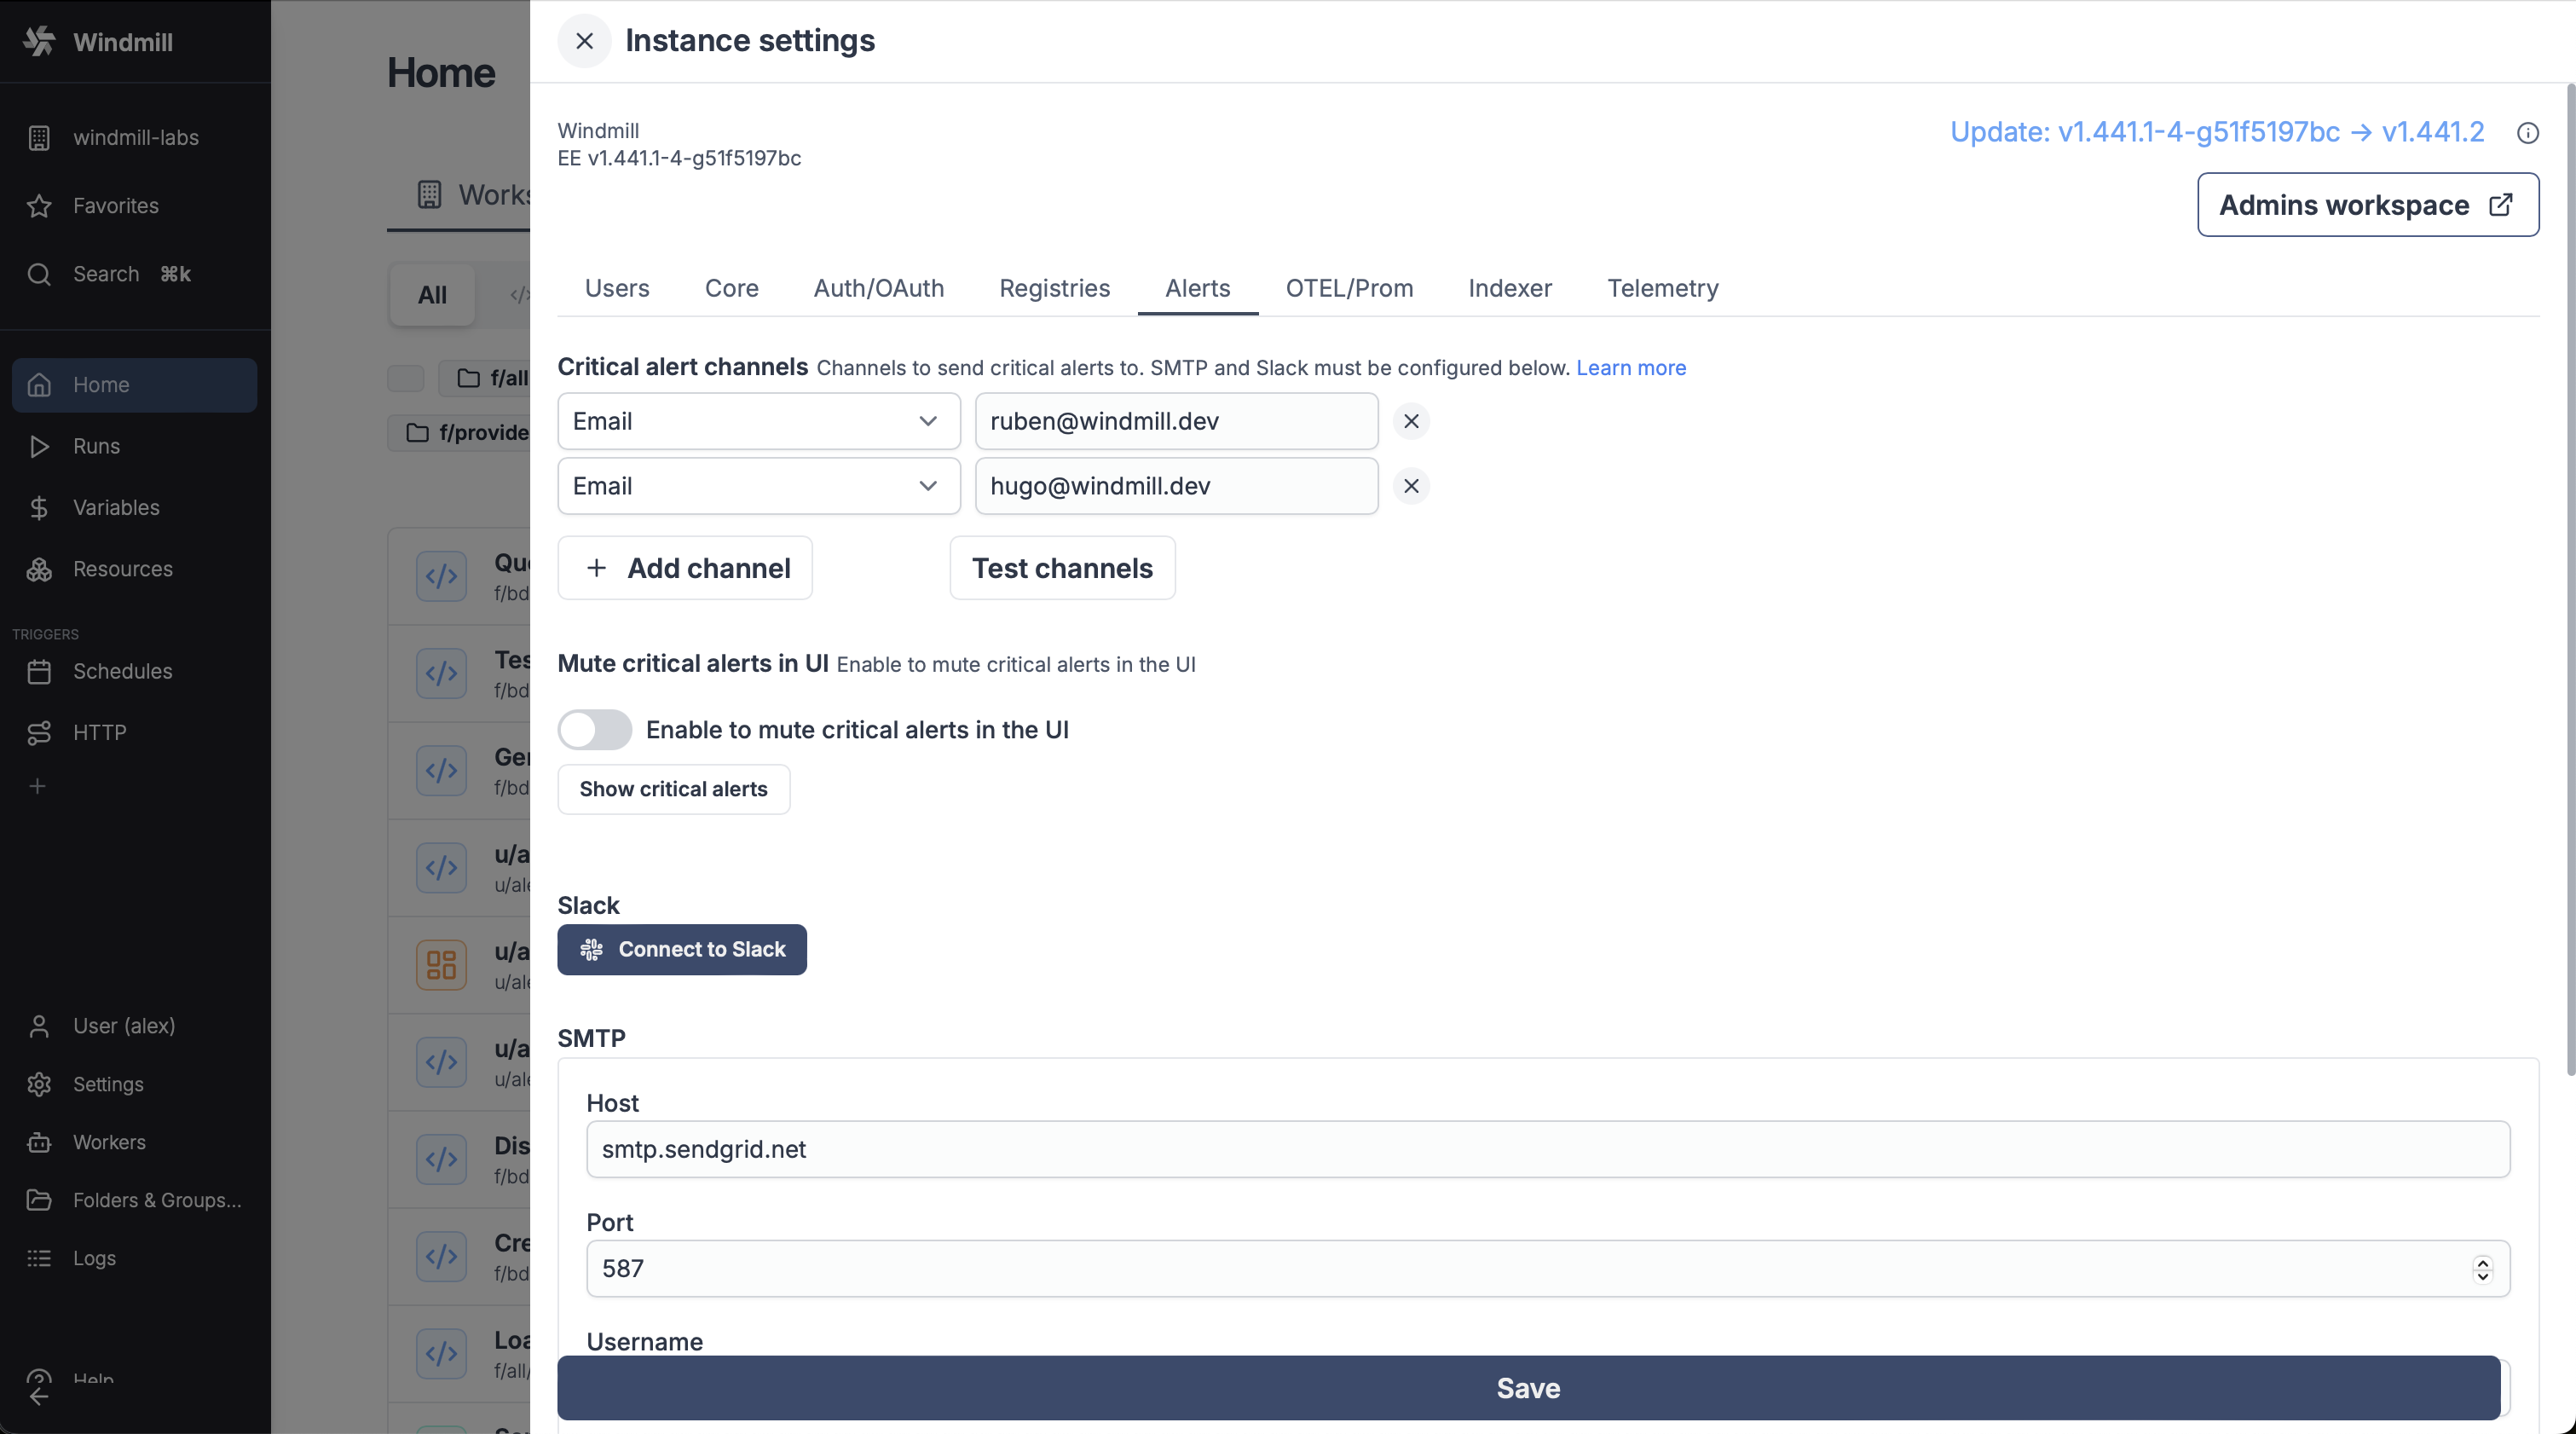
Critical alert channels
Channels to send critical alerts to. SMTP must be configured for the email channel. A Slack workspace must be connected to the instance for the Slack channel. Microsoft Teams must be setup to configure critical alerts to be sent to a Microsoft Teams channel.
You can add multiple channels between Email, Slack, and Microsoft Teams.
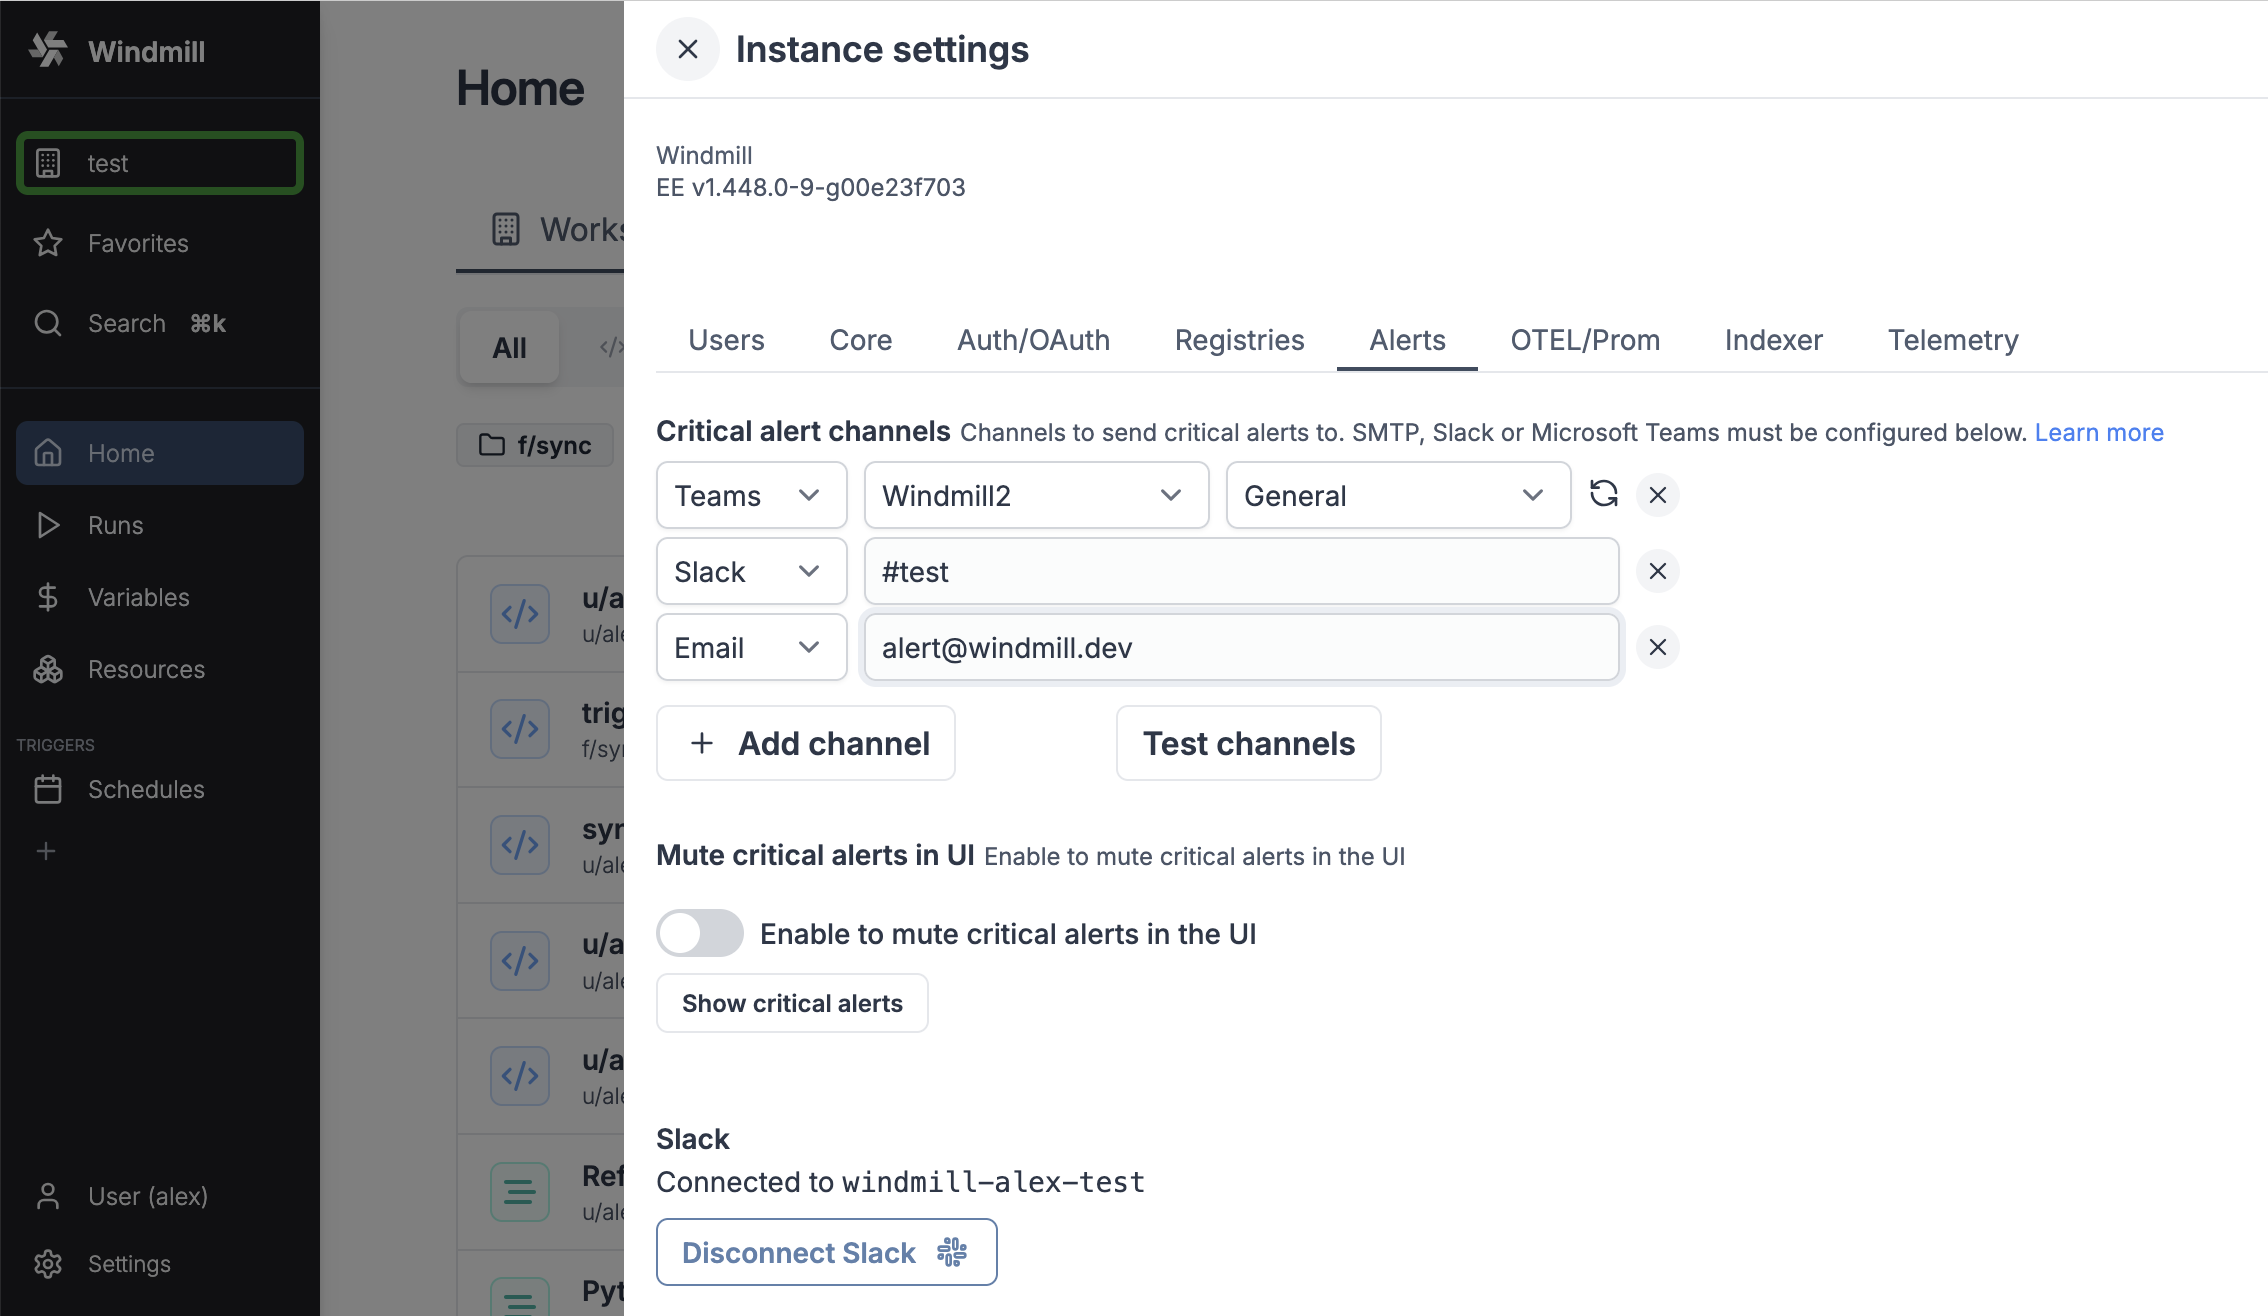
Furthermore you can chose to mute critical alerts in the UI using the "Mute critical alerts in UI" toggle.
This setting is only available on Enterprise Edition.
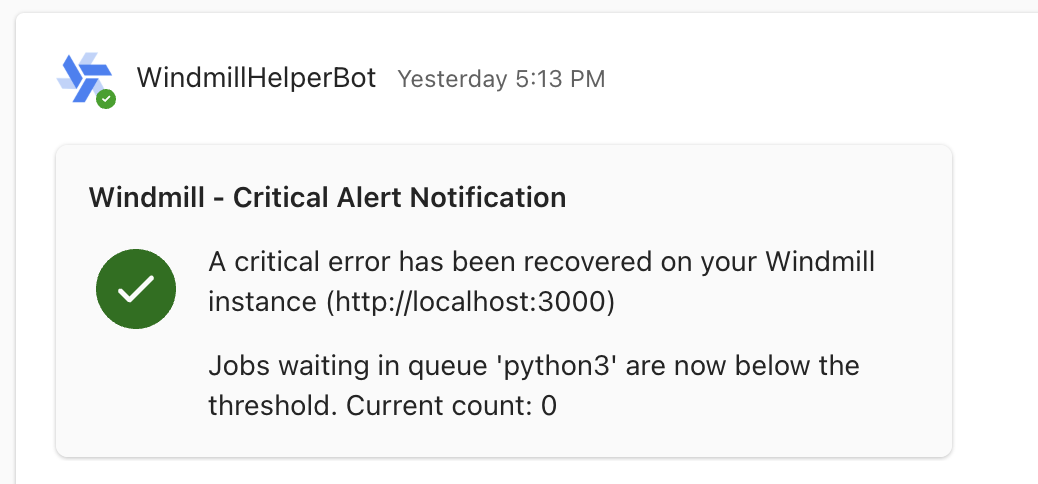
Mute critical alerts in UI
Enable to mute critical alerts in the UI.
Slack
Connecting your instance to a Slack workspace enables critical alerts to be sent to a Slack channel.
Just click on the 'Connect to Slack' button and follow the instructions from Slack.
This setting is only available on Enterprise Edition.
SMTP
Setting SMTP unlocks sending emails upon adding new users to the workspace or the instance and sending critical alerts.
You need to provide the following details:
| Name | Type | Description |
|---|---|---|
| Host | String | SMTP server host |
| Port | Number | SMTP server port |
| Username | String | SMTP server user |
| Password | String | SMTP server password |
| From Address | String | Email address to send emails from |
| Implicit TLS | Boolean | Use implicit TLS (default: false) |
You have another field to test the SMTP settings.
Set-up SMTP from the .env file (depreciated)
The relevant environment variables are:
[email protected]
SMTP_HOST=smtp.gmail.com
SMTP_PORT=587
[email protected]
SMTP_PASSWORD=app_password
If you used the Setup Windmill on localhost method, open the .env file in any text editor. You can use nano, vim, or any other editor you're comfortable with.
nano .env
Append the following to the end of your .env file:
[email protected]
SMTP_HOST=smtp.gmail.com
SMTP_PORT=587
[email protected]
SMTP_PASSWORD=your_app_password
Make sure to replace [email protected] with your actual Gmail email address and your_app_password with the app password you've generated from Gmail.
Note: If you're using Gmail, you'll need to generate an App Password to use as
SMTP_PASSWORD. This is a unique password that Gmail provides for apps and services that want to connect to your account.
Save and Close the File:
- If using
nano, pressCTRL + Oto save and thenCTRL + Xto exit. - If using
vim, pressEsc, then type:wqand pressEnter.
Restart your Windmill application:
- Since you've made changes to the
.envfile, you'll need to restart your Windmill application for the changes to take effect.
docker compose down
docker compose up -d
Now, your Windmill instance should use the SMTP settings you've provided to send invites and email to manually added users. Make sure the SMTP details you've provided are correct and that the Gmail account you're using has allowed less secure apps or generated an App Password.
Set up auto-invites
When creating a workspace, you have the option to invite automatically everyone on the same domain. That's how you make sure that anyone added to the instance is also added to the workspace.
Open Telemetry & Prometheus
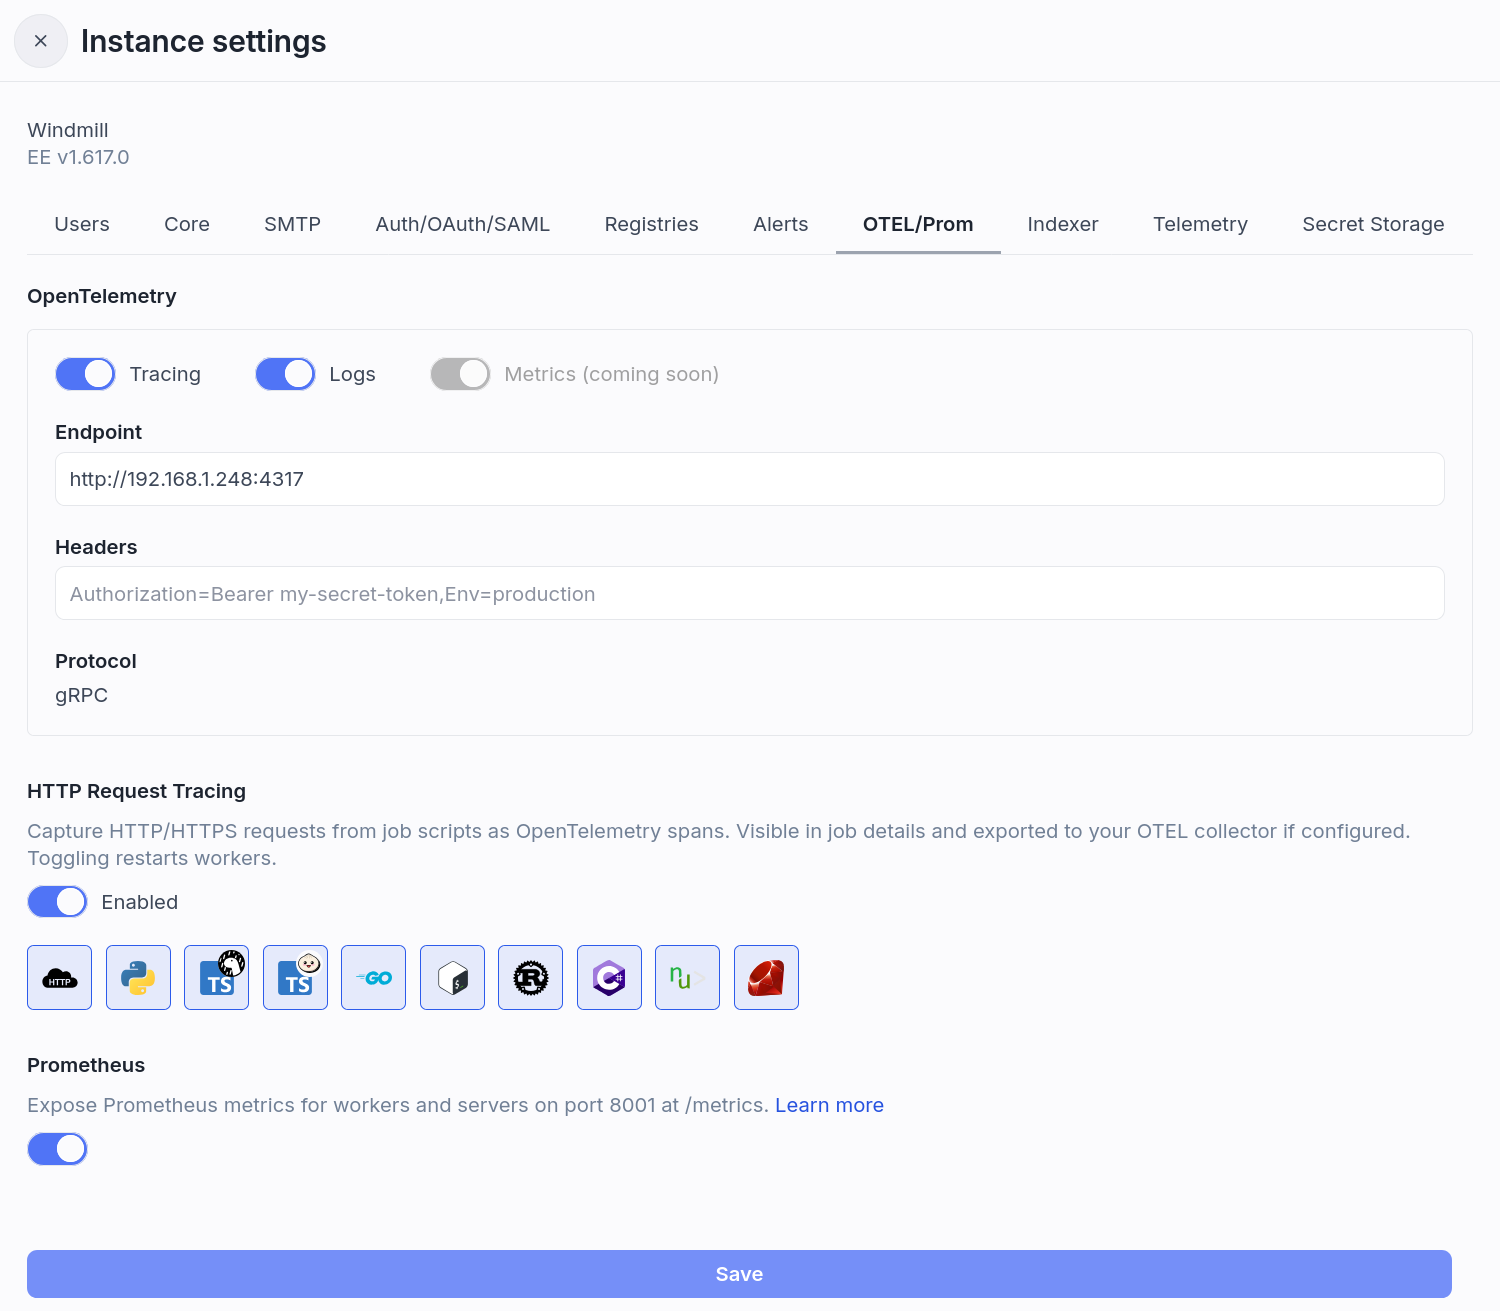
OpenTelemetry (OTEL)
Enable to collect telemetry data and send it to an OpenTelemetry collector such as Jaeger or Tempo for tracing. OpenTelementry data sent to the collector consists of traces, logs and metrics (coming soon). Follow this guide for an example setup.
HTTP tracing
HTTP tracing captures HTTP/HTTPS requests made by job scripts as observability spans within the job details UI. Traces are stored and correlated with the job, displaying method, URL, status code, and timing information.
If the OpenTelemetry external collector is enabled, traces are also sent to that collector and seamlessly integrate with existing spans.
The feature works in two modes:
- Auto-instrumentation for Native TypeScript: uses built-in OpenTelemetry instrumentation to automatically capture
fetch()requests. - MITM proxy for other languages (Python, Bun, Deno, Go, Bash, Rust, C#, Nu, Ruby): outgoing HTTP traffic is routed through a tracing proxy that intercepts and records requests.
You can select which language runtimes should have tracing enabled. Toggling this setting restarts workers.
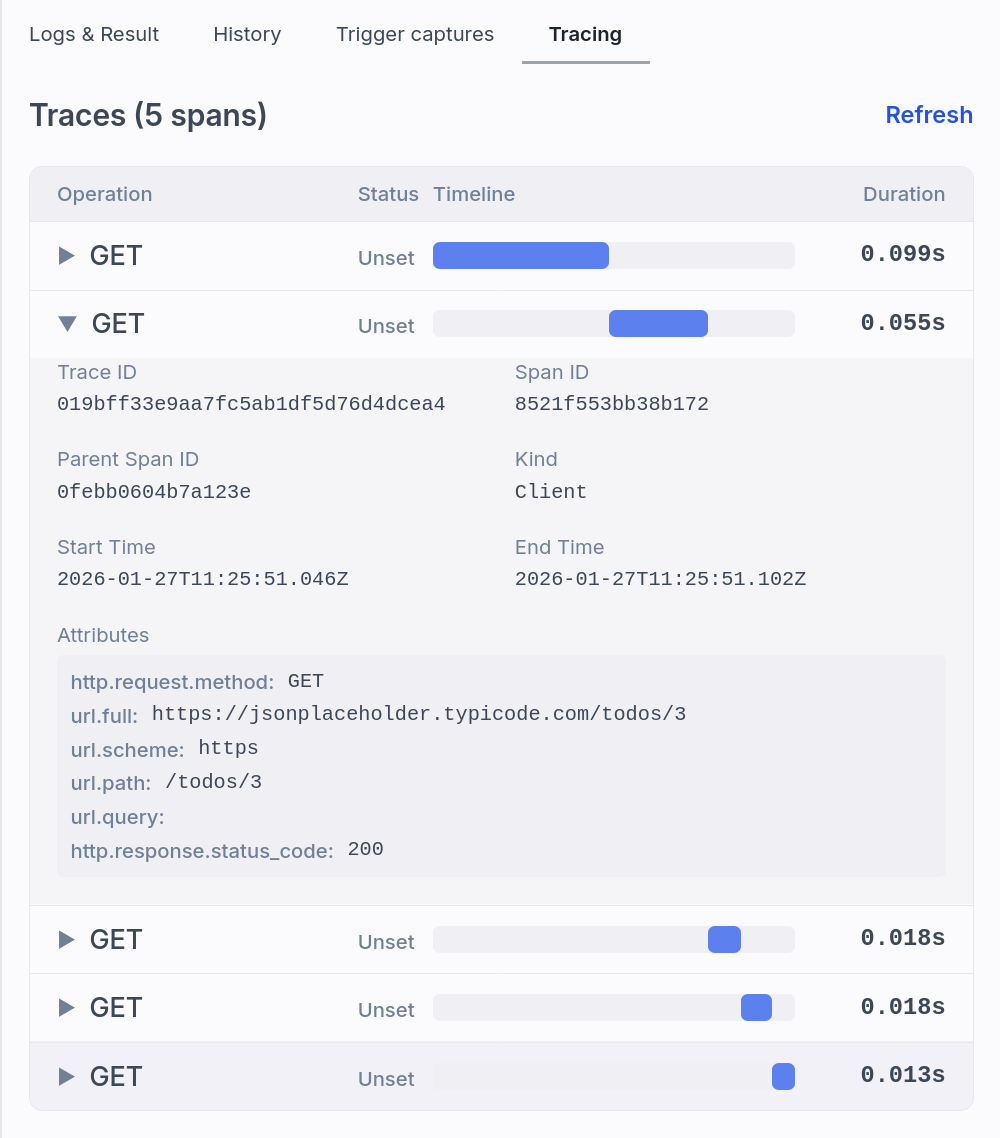
This feature requires NUM_WORKERS=1 (the default). If you run with NUM_WORKERS>1, this feature is not available.
This setting is only available on Enterprise Edition.
Prometheus
Expose Prometheus metrics for workers and servers on port 8001 at /metrics.
Indexer
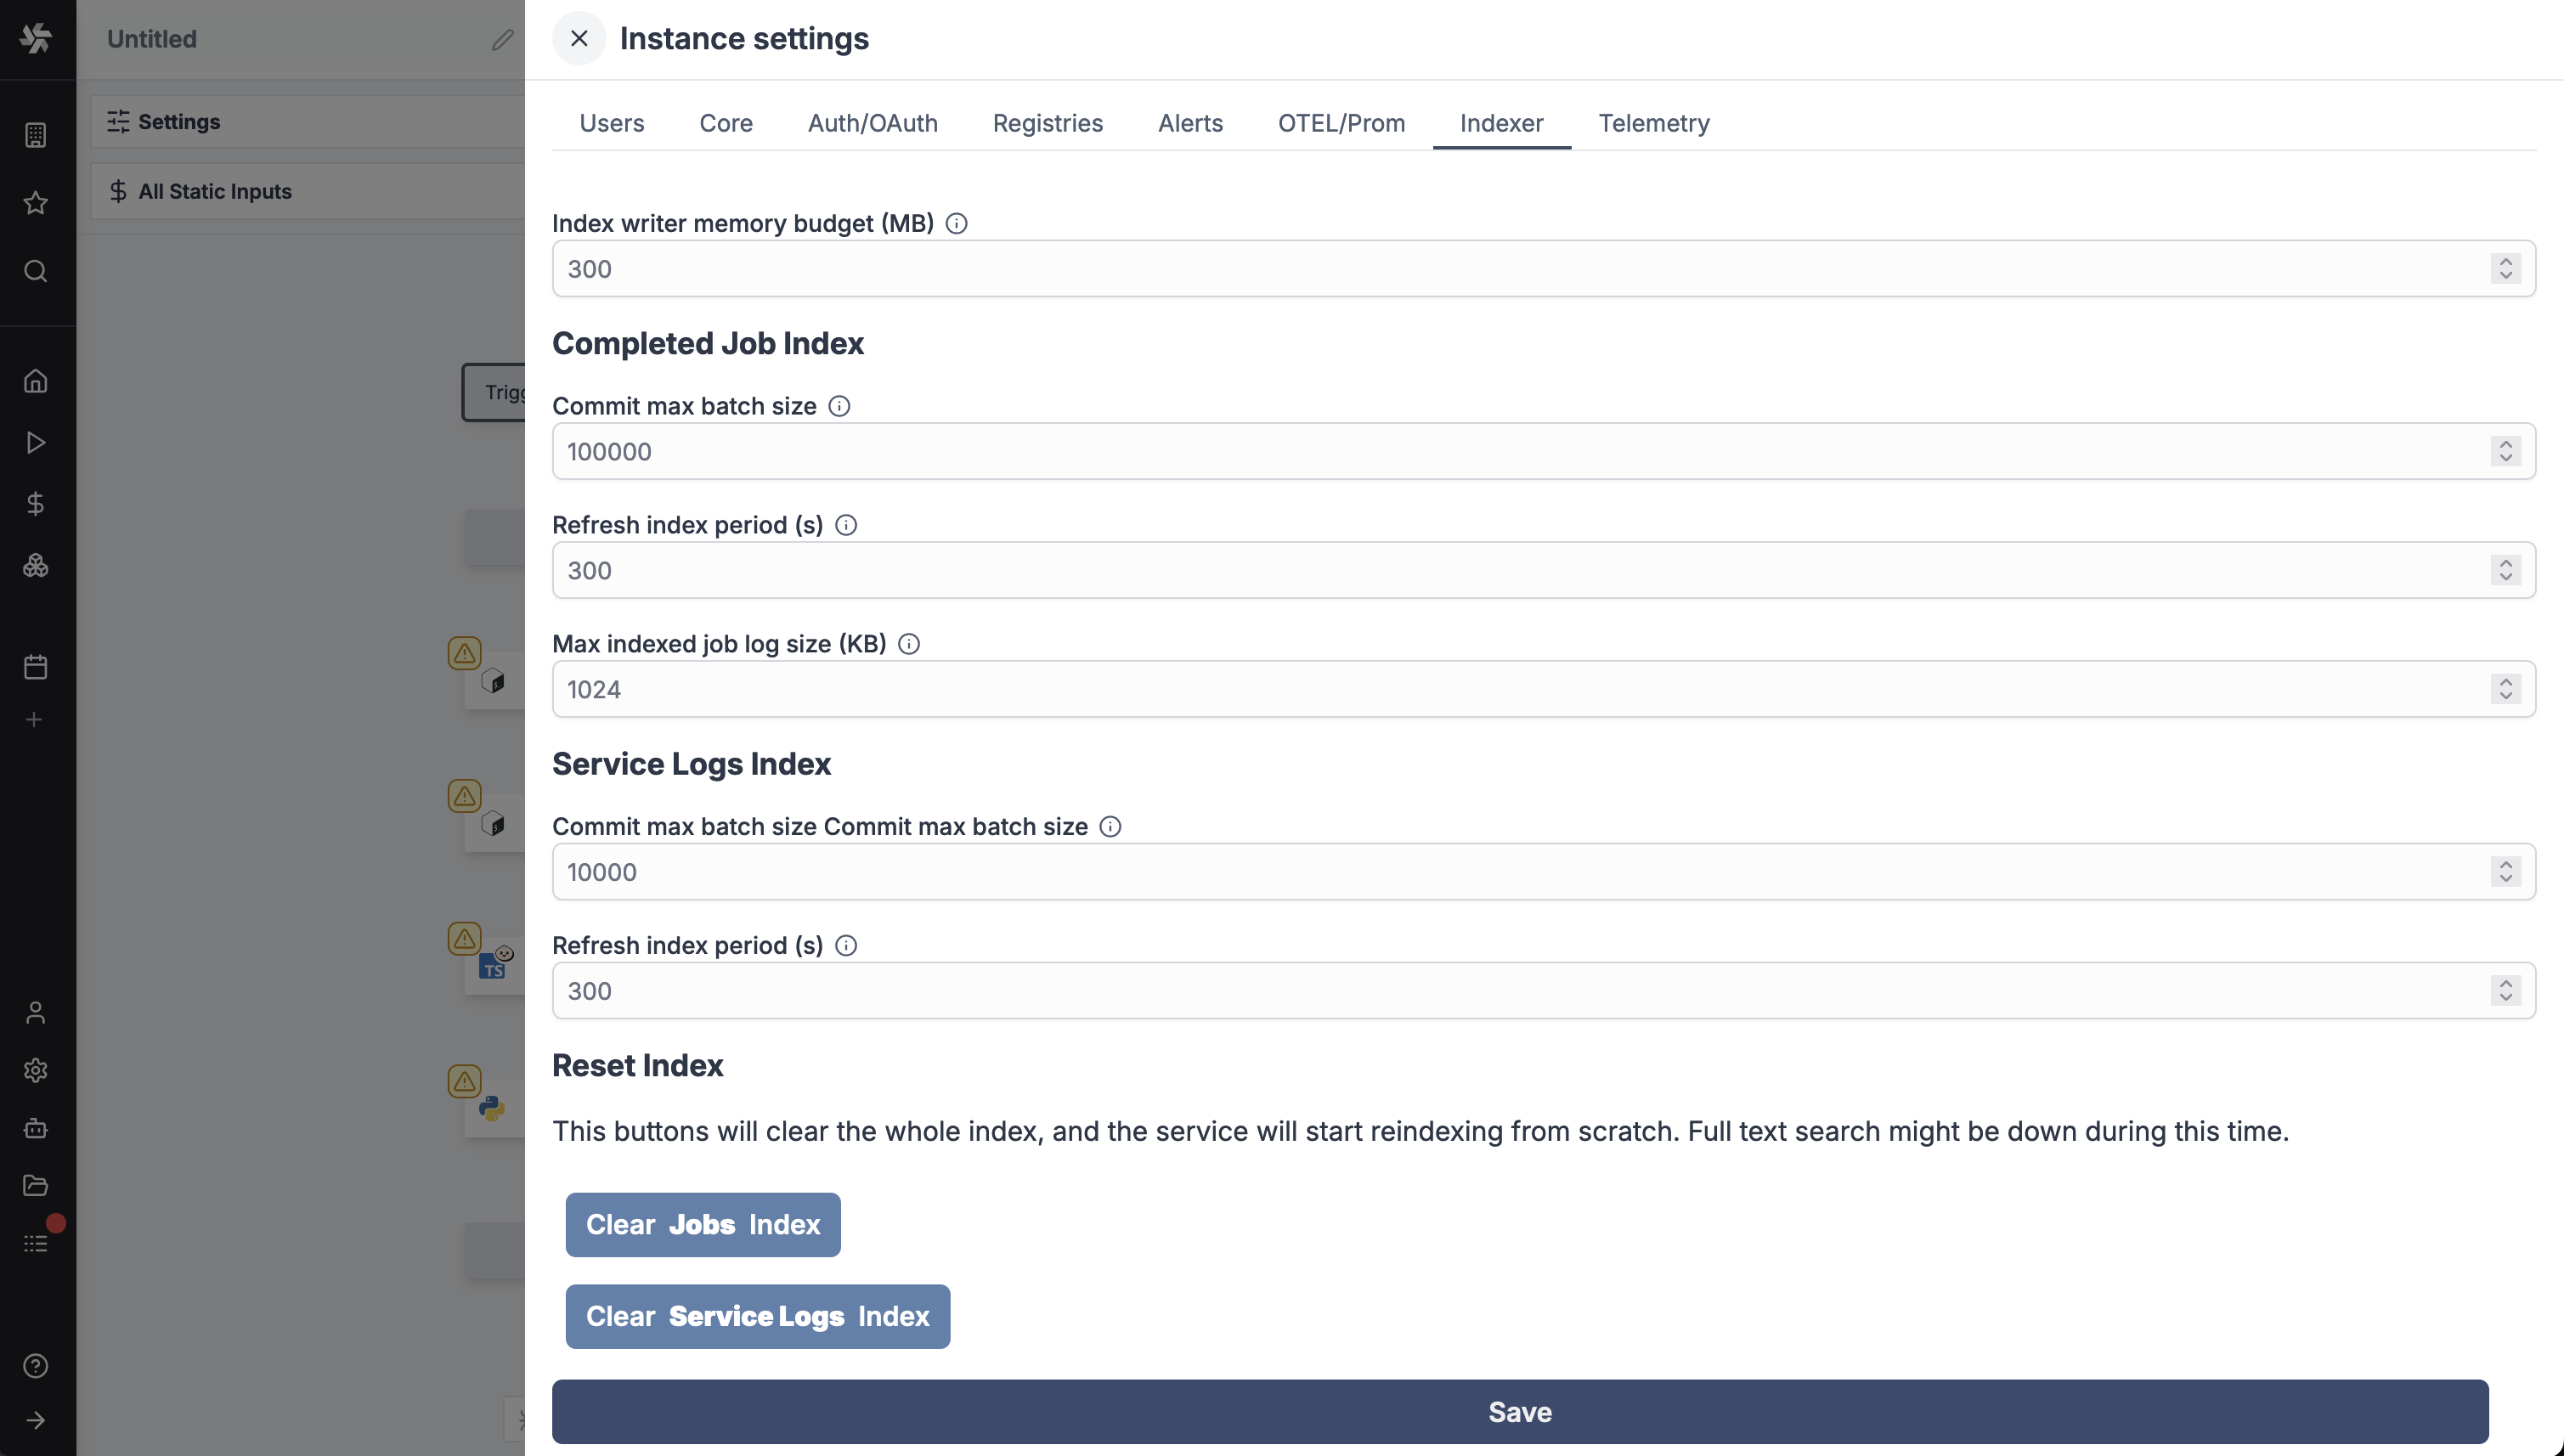
Index writer memory budget
The allocated memory arena for the indexer. A bigger value means less writing to disk and potentially higher indexing throughput
Commit max batch size
The max amount of documents (here jobs) per commit. To optimize indexing throughput, it is best to keep this as high as possible. However, especially when reindexing the whole instance, it can be useful to have a limit on how many jobs can be written without being commited. A commit will make the jobs available for search, constitute a "checkpoint" state in the indexing and will be logged.
Refresh index period
The index will query new jobs periodically and write them on the index. This setting sets that period in seconds.
Max indexed job log size
Job logs are included when indexing, but to avoid the index size growing artificially, the logs will be truncated after that size (in KB) has been reached.
Commit max batch size
The max amount of documents per commit. In this case 1 document is one log file representing all logs during 1 minute for a specific host. To optimize indexing throughput, it is best to keep this as high as possible. However, especially when reindexing the whole instance, it can be useful to have a limit on how many logs can be written without being commited. A commit will make the logs available for search, appear as a log line, and be a "checkpoint" of the indexing progress.
Refresh index period
The index will query new service logs peridically and write them on the index. This setting sets that period in seconds.
Telemetry
Anonymous usage data is collected to help improve Windmill. Telemetry data is sent as a HTTPS request to https://stats.windmill.dev. Stats are sent once a day. Stats only contain the size of workers, their uptime and number of seats used.
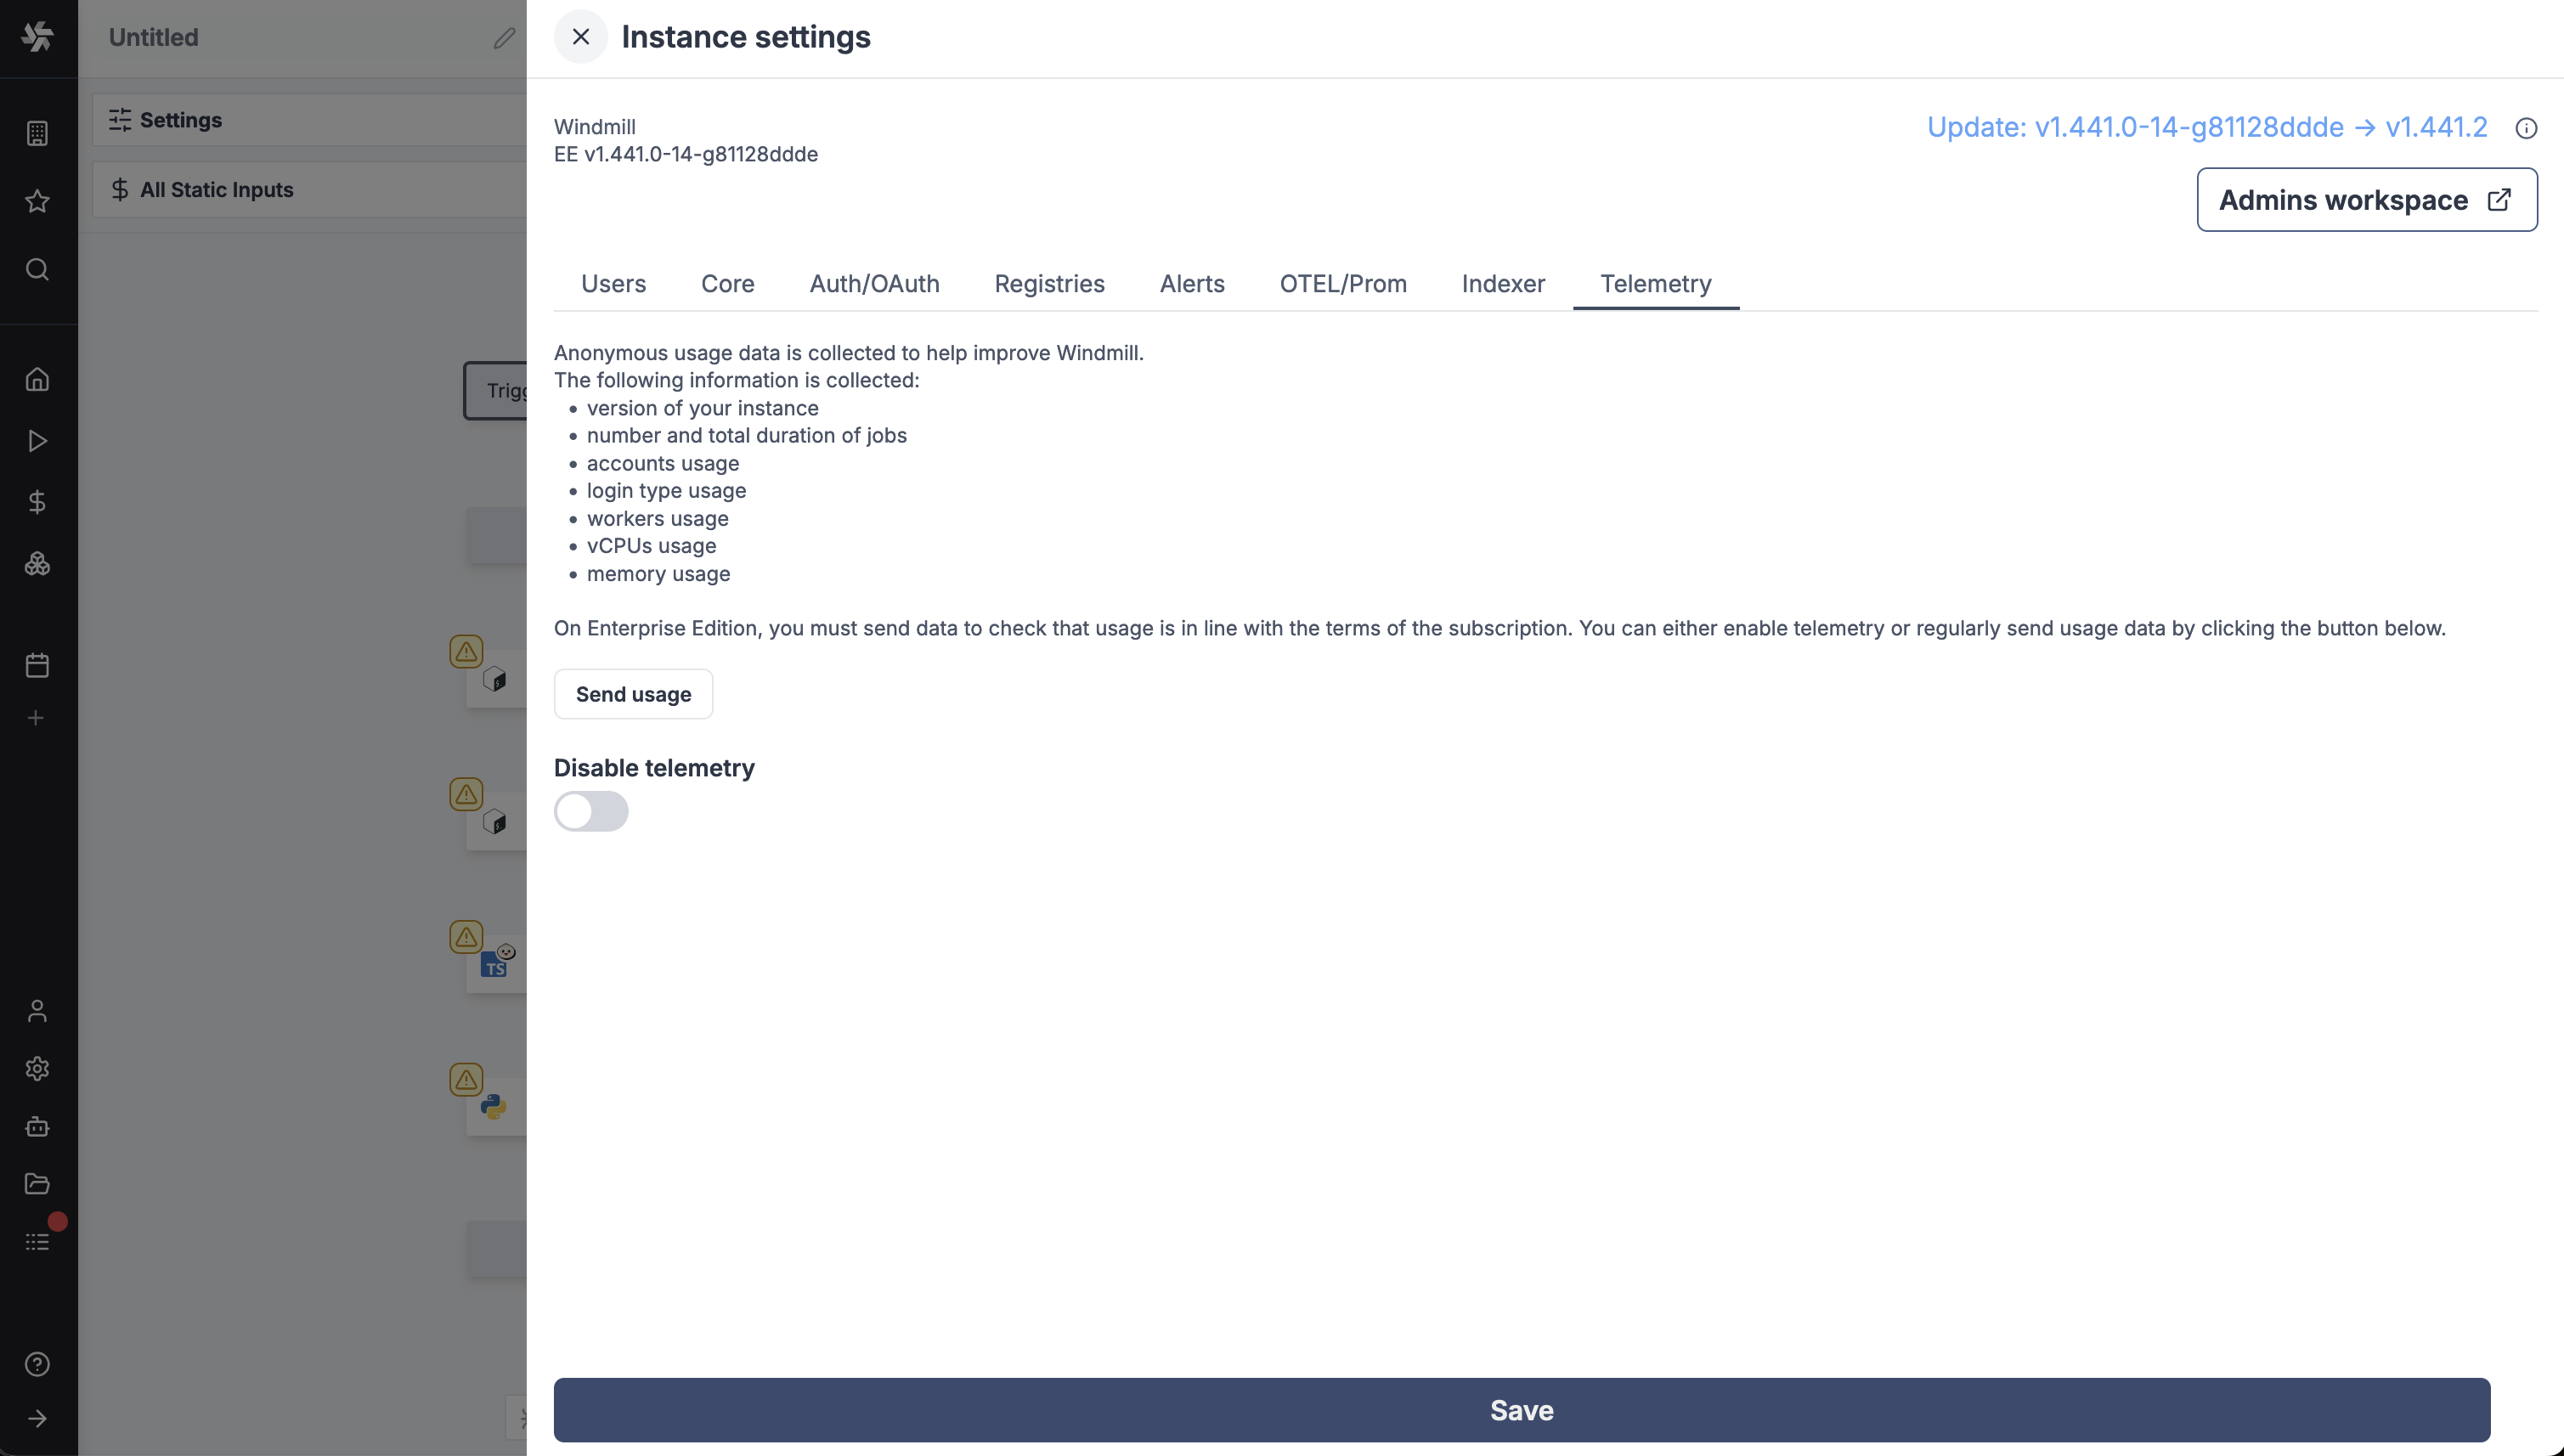
The following information is collected:
- version of your instances
- instance base URL
- job usage (language, total duration, count)
- login type usage (login type, count)
- worker usage (worker, worker instance, vCPUs, memory)
- user usage (author count, operator count)
- superadmin email address
- vCPU usage
- memory usage
- development instance status
From the instance settings, you can manually disable telemetry or "Send usage" to send usage data to Windmill and monitor it from the Customer portal.
Under Enterprise Edition (self-hosted), telemetry is mandatory to ensure usage correctly matches the subscription.